How to fix: Netflix won’t play at 4K

With everyone at home taking advantage of the Christmas period, you may have noticed that your broadcasts do not have the highest quality of service on some occasions. And it is that although luckily we are not experiencing a situation similar to the one previously seen during the first stages of confinement, it is still possible that we suffer the effects of saturation of the lines.
That is why we want to dedicate this quick and straightforward tutorial to explaining how you can configure your Netflix application always to play this content in the highest quality.
Choosing the right Netflix plan and content
First of all, it is worth noting that only Netflix Premium plans have this option available for 4K content, so if we have a lower plan, we can only reach resolutions up to HD at 1080p.
On the other hand, there is also the possibility that the content we are trying to reproduce is not available in 4K. And it is because they are not marked on the title cards. On many occasions, we may be trying to load incompatible content. To do this, we will only have to enter “4K” in the search bar to see only the titles that offer an Ultra HD transmission.
Use a suitable device.
Whether on a TV, computer, or smartphone, our device may not be compatible with the playback of content in 4K. Although Netflix will continue trying to transmit at this resolution (and therefore consuming a more significant amount of data) in these cases, our device will not show it as such.
Set Netflix to play in 4K
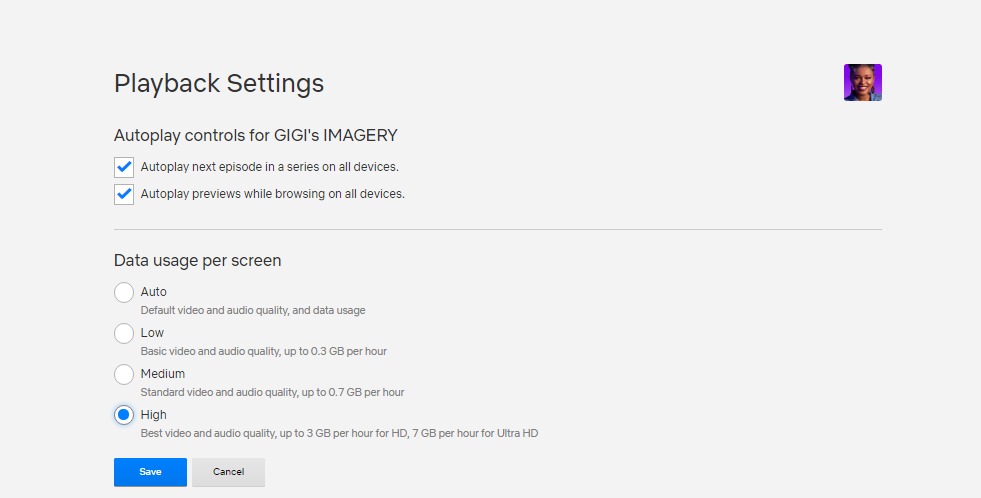
Although we have the Premium plan contracted and our devices are compatible, Netflix is not configured to transmit in 4K by default. And is that usually, the default transmission quality setting is set to “Auto” mode, which will try to use the best possible combination of quality and data usage depending on the device we are using.

However, you can change this setting to set the highest possible playback option. We will only have to load the Netflix profile in which we want to make these changes (yes, if we’re going to change it in all the account profiles, we will have to repeat this step one by one), access the “Account” option or “My profile” from the options menu, and access the “Playback settings.”
Once here, we must choose the “High” setting to ensure that, although the data usage may be higher, our broadcast will not have any limitations in terms of visual quality.
That said, it should be noted that this option will apply to all content and devices, so if we usually switch between devices such as mobiles or if we have a limited data plan, we must be more careful with these types of options.


