Category: Windows

Get the latest news and updates on Microsoft Windows Operating systems, Features, Best picks, Reviews, and How-to tutorials on this section of our website.

  • How to change the wallpaper in Windows 11 to videos or animated photos

    How to change the wallpaper in Windows 11 to videos or animated photos

    In Windows 11, you can make exciting customizations to the wallpapers, placing videos, GIFs, and animated images; achieving this is very simple. In the next section, we will show you how to change the wallpaper in Windows 11 with videos and GIFs?

    How to add Gifs or moving images to the background of your Windows 11 PC?

    The Windows 11 operating system brings with it many features of which we can take full advantage of, one of them is the customization of screens with Gifs or images with movements for the background of the screen, below we will explain how to do it with a free application:

    Using AutoWall

    AutoWall is an application available on GitHub, and it is open-source; therefore, its download is entirely free, it supports formatted files; GIF, avi, .mov. To use this application, you must do the following:

    1. Enter the main page of GitHub; at the bottom of this page is the AutoWall download option. Click on it and download the AutoWall application begins.
    2. Then save it in the folder you want on your computer.
    3. To start executing it, double-click on it, then a small window will be shown with several options. To search for the GIF or the image, you must click on Search, select the one you like the most and then click on the Apply option; and you must also check the box at the bottom of the small window so that the image or GIF you have selected always appears at the bottom of the screen.
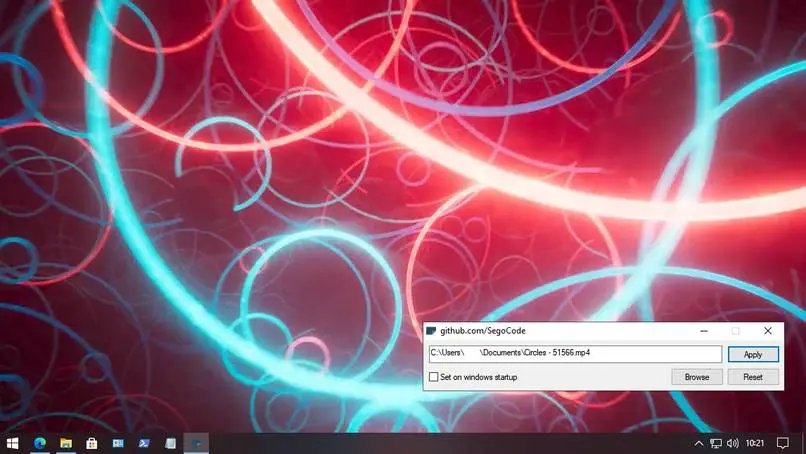
    It is advisable to use a Gif as a moving wallpaper since it only consumes 100 MB of RAM. This type of file is the most recommended by the creator of the AutoWall application, and making these GIFs for wallpapers is very simple.

    How to add long videos on Windows 11 wallpaper?

    On your Windows 11 computer, you can also add long videos to the wallpaper. To achieve this, you must use the following application:

    Desktop Live Wallpaper

    To have this application on your computer, you must carry out the following procedure:

    1. The first thing you should do is click on the Windows icon located at the bottom of your computer screen.
    2. In the menu that was opened for you is the Microsoft Store icon. If you had not previously entered or logged in now, you must do so. For this, you must enter your email in addition to the password that you had previously affiliated with Microsoft.
    3. Inside Microsoft Store, there is a search bar at the top, there place Desktop Live Wallpaper, press enter.
    4. After this, the Search for the Dynamic Wallpaper application will begin. When the search process is completed, and you see the application, click on Get and then on Install to start installing Desktop Live Wallpaper.
    5. When the download is complete, open the Desktop Live Wallpaper application located in the start menu. If the download does not proceed, it may be due to low storage. In this case, we recommend that you free up space on your hard drive.
    6. At the top of the application is the Start option; click on it.
    7. Select the video you want as wallpaper, click on Search, like the video.
    8. Finally, press OK to apply the video you have selected as the wallpaper.
    How to set a wallpaper that changes based on the time of day?

    When customizing the screen, you can change the background of the screen depending on the time of day, this with the following application:

    WinDynamicDesktop

    WinDynamicDesktop is an application that uses the computer’s location to determine the sunrise and sunset to change the background of your computer screen. You can do it through the Microsoft Store to get and use this application. The first thing you must do is enter the application after downloading it, there you must fill in data related to your location, and in the exact windows, you must click on Search, then you must select the topics you want to display. When you finish, press Apply, and you’re done.
    How to set a background song on your Windows 11 pc with MLWAPP?

    When customizing the Windows screen, not only can GIFs, videos, or images with movements be placed, you can also put a background song with the MLWAPP application, which can be obtained from the Microsoft Store.

    This is a free application which allows you to place one or more songs on the wallpaper of your computer, achieving this is very simple you have to enter the application within it you can select the song or songs that you want to be played together with the volume, if there are several songs you have to check the boxes that correspond to the songs, customizing this list is as simple as customizing the Windows Player.
  • Windows 11: Windows Terminal will replace the classic CMD

    Windows 11: Windows Terminal will replace the classic CMD

    According to WindowsCentral, Windows Terminal will replace CMD as the default command-line application in Windows 11 by 2022.

    Microsoft officially introduced Windows Terminal in 2019, and it was a significant update over the current Windows Console Host command line, which is the one we use today.

    The advantages of Windows Terminal over the ‘old’ command line application are many, significantly improving the command line experience and adding a DirectX accelerated rendering engine. You can also open different tabs, add transparency effects, split panels to use multiple command lines in a single window, and customize various ways, such as adding a background or changing fonts.

    Currently, it is possible to download Windows Terminal for free from the Microsoft Store in Windows 10 and Windows 11. It is even possible that Windows Terminal is our default command-line application if we configure it like this in the operating system. However, Microsoft wants this directly to be the default application for this task, rather than waiting for users to download the app and configure it as the default command line.

    To make the new transition smooth, Microsoft will test the changes from its Windows Insider program before rolling it out to the world over the next year. We will keep you informed.

  • How to roll back from Windows 11 to Windows 10 after upgrading

    How to roll back from Windows 11 to Windows 10 after upgrading

    We will explain how to go back from Windows 11 to Windows 10 after updating so that if there is something that has not convinced you after installing Windows 11, you can go back to a previous version that will continue to be maintained for a while. Although it is temporary, we will explain the native procedure that Windows offers, so you will have to decide soon.

    You will only have ten days to go back to Windows 10 after upgrading to Windows 11. After that time, there will no longer be an internal method to do it, and you will have to download the Windows 10 ISO image to install from a USB. Just remember that, as they remind us in Genbeta when they explain the procedure, if you are an Insider and have been using Windows 11 betas for a while, you will no longer be able to return even if you have just updated to the final version.

    The option to revert from Windows 11 to Windows 10

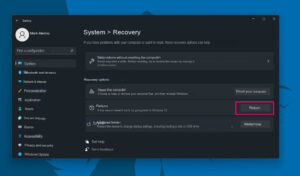
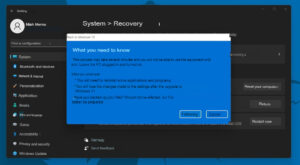
    The first thing you have to do is enter Windows settings. Once you are inside, go to the System section and click on Recovery, where you will find the options to recover or restore Windows. Here, you have to click on the Back option that will appear to go back.

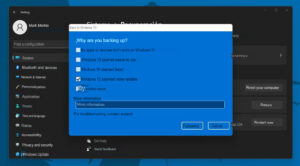
    A window will open in which Microsoft will ask you to indicate why you have decided to return to Windows 10. This will help them have feedback with the impressions of those who have not been convinced by Windows 11.

    Now you will go to another screen with some notices. In it, you are told that you will lose the applications and configuration changes that you have installed or made in Windows 11 after you have updated. And also, in case something should fail, I would recommend that you save your files, photos, and other documents on a separate hard drive or USB. When you have it in this window, click Next.


    Now you will get to the last step of the process. In it, you have to click on the Return to Windows 10 button, and Windows will take care of doing the whole process for you. Now, you simply have to let your computer take a few minutes to do everything it needs to do.

  • How to screen record on Windows 11 without any program

    How to screen record on Windows 11 without any program

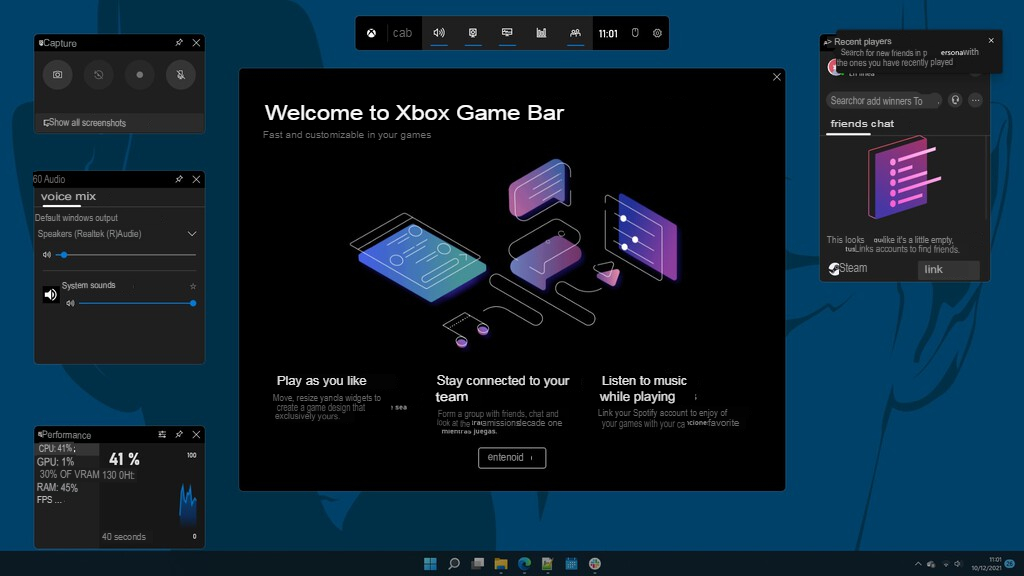
    Windows’ ‘ Game Bar, ‘recently renamed the Xbox Game Bar, remains as available in Windows 11 as it was in Windows 10. As its name will have allowed you to deduce, this application was created to be used while we played video games. Still, the truth is that there is nothing that prevents us from using it to record any other kind of software that we are using, so – if we do not handle more specialized software – it becomes a valuable tool to create short videos that capture what we are doing on screen.

    Of course, since it is designed for games usually played on full screen, the Xbox Game Bar will only allow us to record one application simultaneously (and nothing to include the desktop as a background), unfortunately.

    Steps to follow in recording a short video in a few clicks

    • Step 1: Launch the application you want to record and, once its window is active, display the Xbox Game Bar by simultaneously pressing the Windows keys + ‘G’ on your keyboard.
    • Step 2: Both the bar itself and several floating widgets (corresponding to various application functions) will be displayed on the screen: the only one that interests us is the one you will see with the title ‘Capture.’ If it is not visible, we can activate it from the bar like this:

    • Step 3: We can start the recording from the controls of the capture mentioned above widget or by pressing the Windows + Alt + ‘R’ keys. Do we want the video to include the audio captured by the microphone? For example, we can use the corresponding button on the controls or the Windows + Alt + ‘M’ key combination.
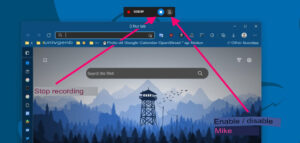
    • Step 4: While the bar is recording the screen, we will see a floating bar that shows the recording time and controls to stop recording and to activate/deactivate the microphone. Thus, once we have finished recording, we must press the ‘Stop’ button.

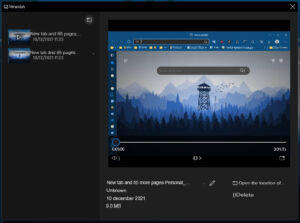
    • Step 5: Immediately after that, a notification will appear on the screen, offering us to view the recorded clip. If we click on it, the ‘Captures’ folder within the ‘Videos’ folder will open in Windows Explorer.
  • How to make sure a PC is malware-free

    How to make sure a PC is malware-free

    Nothing lasts forever, and you are likely about to end the summer holidays and start a new period of ‘back to school.’ Before entering the daily battle, it is an excellent time to perform maintenance on our favorite computer equipment, performing those set-up tasks that are going to offer us real benefits in terms of performance and reliability, as well as those related to cybersecurity and especially the search for malware on a PC.

    The amount of malicious code that reaches global technology week after week is staggering. Install a good security solution to combat it is mandatory in professional areas. We can say almost the same in consumer areas, with the necessary caution when browsing the Internet, downloading files, or correctly managing emails and links on social networks.

    How to scan a PC for malware

    As not all computers have security solutions installed and also not all types of malware can be fought once the operating system has started because they are loaded in memory, making their detection and elimination difficult, the use of an external means independent of the PC to be analyzed, capable of detecting and disinfecting malware and without the need for a permanent installation that ends up affecting its performance to some degree, it is an ideal solution.

    All the big security providers offer these kinds of solutions. Most are  Linux-based and provided in “Live CD / USB” formats, created and bootable from optical drives, USB sticks, or external drives.

    A list of the best available:

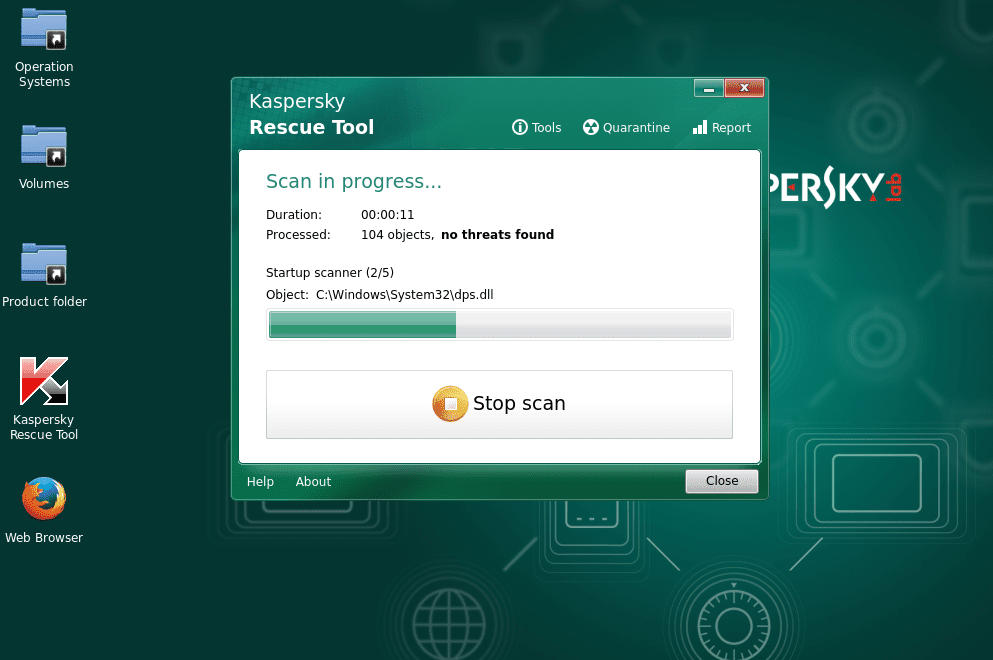
    1. Kaspersky Rescue Disk. Kaspersky has not updated the interface for a long time, but its Gentoo-based rescue disk has the incredible power of the leader in consumer security solutions. You download the ISO image, save it to bootable media, and use it.
    2. ESET SysRescue Live. ESET offers the download of an image to burn and provides the possibility to create it directly on CD or USB. Perfectly updated interface and is very easy to use.
    3. Bitdefender Rescue CD. Personally, it is one of the ones I like the most. It uses a Linux based on Xubuntu that allows greater possibilities and virus elimination. You download the ISO from the link and burn it in the middle.
    4. AVG Rescue CD. Offers two different images for creation on CD or USB. Its interface is quite spartan based on text but doesn’t be scared, it does its job, and like the rest, it previously updates the virus database to the latest available.
    5. Panda SafeDisk. Another that, like Kaspersky, has not been updated for a long time but continues to fulfill its function. Very easy to use because it does not have too many customization options. It loads a wizard that automatically searches for available antivirus definitions and, when start is pressed, begins scanning the entire system for malicious files.
    6. Trend Micro Rescue Disk. Effortless creation of the rescue medium at the click of a button from your website and with the option to choose CD / DVD or USB disk/pen drive. Its interface is the most spartan of the entire list, in a minimalist text mode with a few basic options.
    7. Norton Bootable Recovery Tool. Symantec offers startup disk creation with a wizard that makes it easy to create it without external applications once you have downloaded the tool. Once started, you will see a graphical but minimalist interface without customization options, with two main options: scan and clean.
    8. Avira Rescue System. I offered to download an image to create the medium. Graphical interface with few functions but easy to use. Like others that we have seen with a simple interface, its power lies in the search and disinfection engine and its ability to update the virus database, something that all of them do.
    9. F-Secure Rescue CD. Another of the simplest and at the same time easy to use. There is no natural user interface with a Knoppix database except for a text-based dialog, where you will be asked if you want to start the analysis.
    10. Avast. It is the only one on the list that does not offer direct download of an image, and the only way is to create the rescue disk from an Avast solution. The good news is that it can be done from the free desktop version. The downside is that you have to install it first.

    Using these solutions is straightforward once the rescue media is created. We reboot the machine with the medium inserted in its location to boot from it. If we have not done it previously, we will have to enter the BIOS to place the optical or USB drive as the first boot media, always before the hard drive or SSD where we have the system installed.

    The media created is a “Live CD” format, so we will not have to install anything on our computer’s hard drive or SSD. Some solutions offer a visual environment and more functions. In contrast, others use a text-mode dedicated entirely to malware, understanding that the main thing is the power of its engine and the updates of its virus base, something that everyone does before scanning the system.

    Some solutions are highly customizable, allow you to search for malware, select scan, disinfection, boot sector, quick or complete scan, files and folders on hard drives or external drives, network access, heuristic method, and almost everything can find in one installable security solution.

    In summary: A group of excellent tools that any user should not miss because they allow to locate and disinfect malware from a PC in a simple way without touching the operating system. A consumer (because business computers are something else) can save himself on installed antivirus if he is cautious about security and uses it as a regular maintenance task.

  • How to enable BitLocker in Windows 11

    How to enable BitLocker in Windows 11

    BitLocker is a data protection feature that Microsoft has included in the business and professional versions of its operating systems since Windows 8. The company kept it in Windows 10 and will also be usable in the new Windows 11 beta-tested for public launch in the last quarter of 2021.

    In case you do not know, BitLocker is a security tool that allows you to encrypt or “encode” the computer’s data to keep it protected, facing threats such as data theft or exposure in case of loss, theft, or withdrawal of inappropriate equipment of an IT infrastructure. Something that happens too many times.

    BitLocker protection on operating system drives supports two-factor authentication using the Trusted Platform Module (TPM) in conjunction with a personal identification number (PIN) or startup key and one-factor authentication using storing a key on a USB flash drive or using only the TPM.

    Using BitLocker with a TPM provides more excellent data protection and helps ensure the integrity of the initial boot component. Remember that one of the mandatory hardware requirements for computers that intend to run Windows 11 will be this type of “trusted platform module” or TPM.

    BitLocker in Windows 11

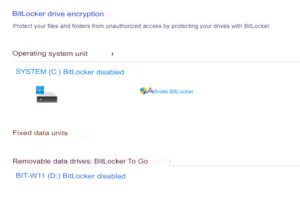
    BitLocker can be enabled on the operating system disk drives (the drive where Windows 11 is installed), on a fixed data disk drive (such as an internal hard disk or SSD), or a removable data disk drive (such as a USB flash drive).

    Activating BitLocker in Windows 11 is done as follows:

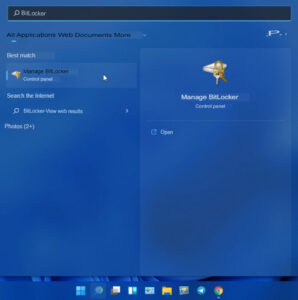
    • Access the Control Panel from the system search option.
    • Open BitLocker Drive Encryption.

    • Under Operating system disk drive, expand the information for the disk drive, and then tap or click Turn on BitLocker.
    • For the example, we activate it on a USB Pendrive.
    • You may be asked to provide an administrator password or confirm your choice.

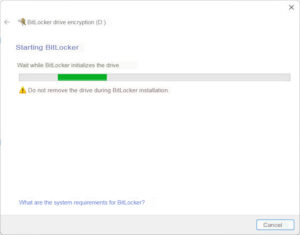
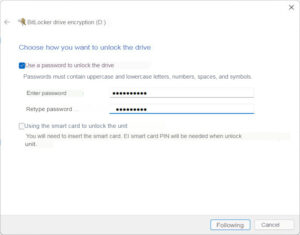
    • The BitLocker Disk Drive Encryption wizard may take a few moments to prepare your computer. Follow the prompts until the Select how to unlock the disk drive at the startup screen.

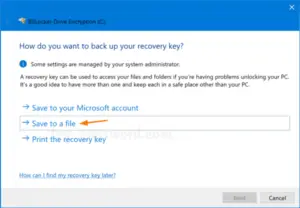
    • Choose how to lock the disk drive, then follow the instructions until you want to back up the recovery key? Screen appears.
    • Choose how to back up the recovery key, then tap or click Next.

    • You may want to print a copy of the security key to saving it.
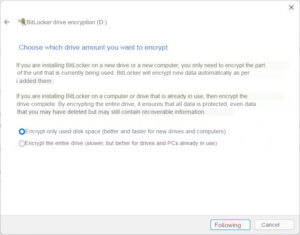
    • Choose which disk drive volume you want to encrypt, then tap or click Next.

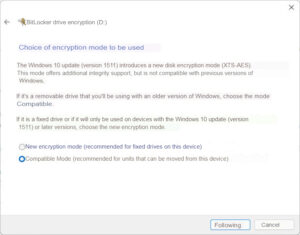
    • Select the encryption mode to use. BitLocker in Windows 11 can take advantage of the new XTS-AES encryption mode introduced in Windows 10 updates, but if you are encrypting an external or removable drive, select the supported mode to open the drive on computers with earlier versions of Windows.

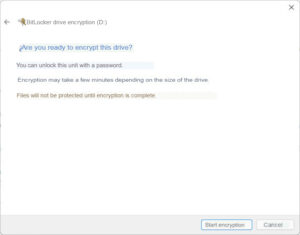
    • Running the system check is one way to make sure BitLocker works appropriately, but it will take longer, and you will have to restart your computer. If you choose to run the system check, ensure you’ve saved what you’ve been doing before resuming. Upon restart, the computer will ask you to unlock the operating system disk drive using the method of your choice.

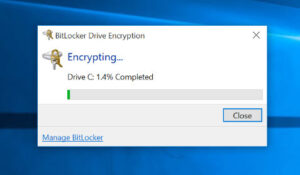
    • The tool will act automatically until the creation is finished.

    As you may have seen, activating BitLocker in Windows 11 is as simple as in previous versions of the operating system. It is an excellent way to encrypt or “encode” the data on a storage unit using a free, native internal tool. Data theft or exposure in the event of loss, theft, or inappropriate removal of equipment from an IT infrastructure. 

  • How to fix windows not detecting external monitor

    How to fix windows not detecting external monitor

    Nowadays it is becoming more and more common to use two monitors connected simultaneously to our computer. This makes it possible to perform multiple functions if we tend to work with many open programs or windows since we can distribute the use of these among the tasks to be performed.

    However, there are times when Windows can play tricks on us and be able to detect that second monitor while reporting an error. That is why we are going to see how we can solve it.

    [ads1]

    Setting up different monitors for use in Windows is a good way to expand our workspace so that we can more comfortably use different applications at the same time. Connecting them to the PC is quite simple, but there are occasions where we can find some problems in this regard.

    Why is Windows not detecting an external monitor?

    That window cannot detect our second monitor can be frustrating, and we may not know for sure what the reason may be. This is something that can happen especially when we try to connect several of them that are very old, due to bad drivers, with screen resolution or hardware-related problems.

    Whatever the reason why the operating system is not able to detect them, it is possible to carry out certain operations that can help us solve the problem. From checking the cabling to updating the graphics card drivers. Sometimes a simple reboot of the system may be enough, other times it will be necessary to make some adjustments in the system configuration or use its error detection tool.

    Steps to fix the problem

    Next, we go on to detail different actions that we can take to solve the problem, something that we can do from the tools that the operating system makes available to us.

    Reboot the system

    It is possibly the most basic solution, but in many cases, it can also be the most effective, even when the system is not able to detect them. By restarting, all programs and processes that we are executing and that may interfere and cause the problem is closed. In case it does not work, we can try to turn it off completely, wait a few minutes and turn it on again. To turn off or restart the PC we must click on the Start menu and then click on the “Start / Shutdown” button.

    Check that it is not a hardware problem

    We must also rule out that, instead of a software problem, we are facing a hardware problem due to the physical connection. If it does not appear in the system configuration, we must confirm that the monitors are connected to a power source and that it is turned on. We must also verify the connection of the cable that connects to the PC graphic and try a different cable to confirm that it is not defective. In addition, we will disconnect all peripherals such as cameras, printers, etc., in order to confirm that none of them are in conflict.

    Configure multi-screen options

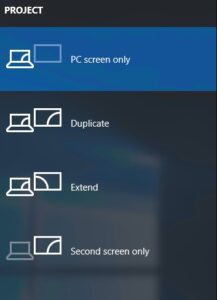
    Although Windows is capable of automatically detecting all the screens connected to the system, we must also activate them manually from the “Settings” section. To do this, we click on the «Activity Center» at the bottom right and click on «Project». Next, we make sure we have selected the “Duplicate” option for our secondary monitor.

    In the same way, we can do this same operation by pressing the “Windows + I” shortcut to access the “Configuration”. Later we click on «System» and «Screen». We scroll to the bottom and click on the drop-down menu to select the “Duplicate or Extend” option. If it is already configured in one of these options, we change the configuration to another and then revert the changes.

    Force detection

    In the event that we do not find any problem in the physical connections that connect the computer with other monitors, we can force their detection from the Windows “Settings” section, because although the connection is made through Plug & Play, it may not always be done automatically.


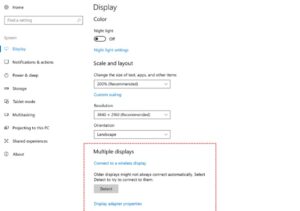
    To do this, we will press the keyboard shortcut “Windows + I”. Once in the «Configuration» menu, click on the «System» section. Now on the left side, we go to «Screen». We scroll to the bottom of the right part until we find the section “Several screens”. Here we click on the “Detect” button.

    Check if the resolution is correct

    If we’ve plugged in a second, higher resolution monitor and found that Windows isn’t able to display it correctly, it may be because it’s borrowing the settings from the previous screen or trying to match it to the main one.

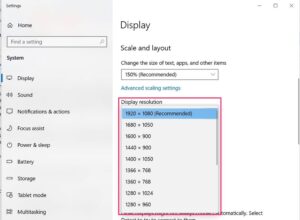
    To check this, we must click with the right button of the mouse on a blank space on our desktop, and in the context menu select “Screen Settings”. This will open the “Settings” section with the panel loaded by default. Then we click on the secondary screen and move to the “Scale and distribution” section. We click on the “Screen resolution” drop-down menu and select the one that best suits our needs. By default, Windows designates one of these resolutions as recommended based on the characteristics of your monitor.

    Update or reinstall video drivers

    If our computer has damaged or outdated drivers, it may be the cause of the problem. Therefore, it will be necessary for us to proceed to reinstall, uninstall or revert to a previous version of the drivers to resolve the error.

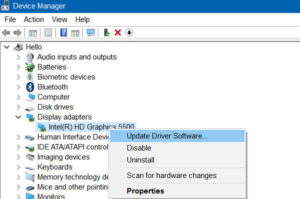
    This is something that we must do from the “Device Manager”, which we must access by pressing the keyboard shortcut “Windows + X” and selecting it from the menu that will appear on the left side of the screen.

    Update drivers

    First we must check if our graphics card appears with an admiration symbol in yellow . If so, it indicates that we are facing a problem with the drivers. Next, right-click on the card and select “Update” from the context menu . Finally, in the new window we indicate that Windows search for the drivers automatically.

    Go back to a previous version

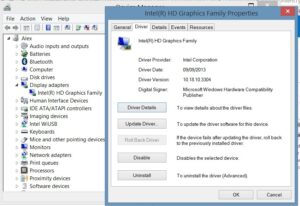
    The problem may have started to occur after a driver update was performed. If that is our case, we can try to solve it by going back to a previous version of it . To do this, it is necessary to click with the right button of the mouse on our graph and select “Properties”. Later in the “Driver” tab, we must click on the “Revert to the previous driver” button, which will be enabled if we have performed a recent installation. Otherwise it will be disabled.

    Uninstall and reinstall the drivers

    We can also try to uninstall the drivers of our video card and reinstall them again to see if it solves our problem. To do this, click with the right mouse button on the graphics card and select the “Properties” option. Then we click on the “Driver” tab and click on the “Uninstall the device” option.

    Once this is done, we restart the computer and return to Device Manager. Now, we click with the right mouse button on the name of our PC that appears at the top and clicks on «Search for hardware changes». If the system is not able to detect the drivers, we can download them from the manufacturer’s website, either AMDNVIDIA, or Intel, and install them manually on the computer.

    Once installed again, we confirm that everything is correct. To do this, we go back to the “Properties” section of the graph. Next, in the “General” tab, the message This device is working correctly should appear. If so, the problem with the drivers is fixed.

    Use the Hardware and Devices Troubleshooter

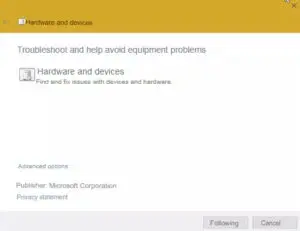
    If the problem persists, we can use the Hardware and Devices Troubleshooter that is integrated into the operating system. This tool is specialized in problem-solving. Previously, it could be accessed from the “Settings” menu, in the “Update and security” and “Troubleshoot” sections. However, in the most current versions of Windows, it is no longer possible, and it is necessary to access it from the command line.

    In this way, just press the keyboard shortcut “Windows + R” and we will launch the “Run” tool. Here we must write the following command and press Enter to confirm the operation.

    [ads2]

    msdt.exe -id DeviceDiagnostic


    This is how we launch the troubleshooter, so you just have to click on Next and follow the steps of the wizard. The tool will be in charge of looking for possible hardware problems and once finished it will notify us of it.

  • How to install Windows 11 wallpapers

    How to install Windows 11 wallpapers

    Windows 11 has hit the media landscape like a cyclone. And that has not yet been announced (or even confirmed) by Microsoft, something that we hope will happen next Thursday, June 24, at the event scheduled to talk about “the future of Windows” and that, as a novelty of yesterday, will have a second conference separate from the main one and dedicated to developers. 

    Nobody escapes that software support will be critical. What began as a mere rumor continued with increasingly precise signals until the first version of this Windows 11 ended up leaking.

    [ads1]

    Yes, it seems that Microsoft is willing to hit the table we were asking for and change the course of its system desktop operating. However, it remains to be seen how the ‘revolution’ does while maintaining current support for the vast Windows ecosystem.

    So far, Windows 10X will be the starting point. Although it was canceled a few months ago when its premiere was expected to govern the new generation of foldable and entry-level laptops, all development work will be leveraged for the general version of the following desktop Windows.

    Since Windows 10 will have official support until October 2025, Microsoft has time to produce the “Windows of the future” that its users want.

    Windows 11 wallpaper

    The leaked version of Windows 11 first emerged on a forum of Chinese origin. Although it seems legitimate, it cannot be guaranteed that it has not been manipulated (including malware).

    It is also preliminary that its installation is not recommended except for the most enthusiastic and only loaded in virtual machines to ensure security. And be careful with downloading the ISO images in the Torrent network because we see some very bad looking … We will test it thoroughly when Microsoft publishes the first preview version.

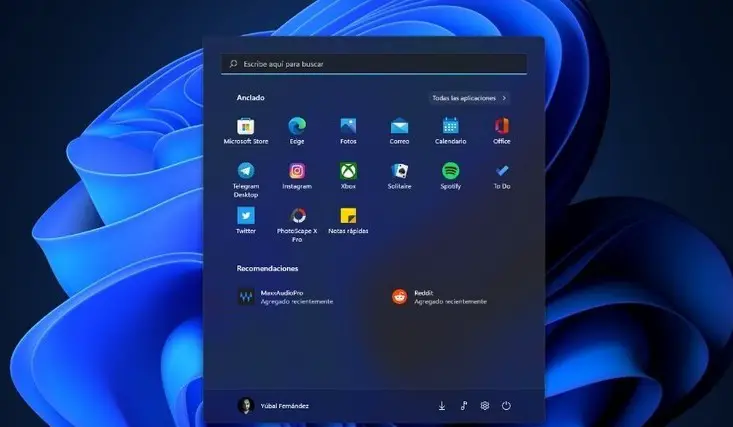
    What we can do now is use some of its components. Microsoft accentuates the visuals, and any major renovation has to ‘enter through the eye. We see it in the new start menu that floats over the taskbar and that by default is centered in the middle of the screen (does it sound like the macOS dock?) Or in the Windows 11 wallpapers that we can install in Windows previous (or other platforms).

    The collection looks great, both the two backgrounds that will be seen by default in the first installation and the other four groups of images that accompany it:

    Default wallpaper for system light and dark modes.

    The ‘Captured Motion’ collection shows a still frame in different ways while in motion.

    The ‘Flow’ wallpaper collection shows a flow of thin shapes in different shapes and colors.

    The ‘Glow’ collection consists of four wallpapers that show a circular object that shines in different colors.

    The ‘Sunrise‘ collection is a set of four wallpapers showing the sunrise over various scenic landscapes.

    The installation of any of them is straightforward. The guys at ChangeWindows have made it easy for us, compiling all these high-resolution images in a compressed. ZIP file. They can be downloaded from this OneDrive link, and once on our PC, using them is as easy as selecting them:

    1. Right-click anywhere on the desktop.
    2. Select ‘Customize.’
    3. In ‘Background’ select ‘Image’ and ‘Browse’.
    4. Find the path of the image you just downloaded and want to use. Apply, and you will see the desired image.

    Entirely cool these Windows 11 wallpapers that confirm the renewal of the visual section that Microsoft is looking for. We do not rule out much more in the final version of the system for which we do not know the release date. Windows 10 has years of support left. We will know more at the event on the 24th. Don’t miss it!

  • How to format FAT32 devices in Windows

    How to format FAT32 devices in Windows

    FAT32 is a file system that came as an improvement on FAT16 and the old FAT created for MS-DOS. Although other more advanced ones are natively supported by Windows (exFAT and NTFS ), it is still one of the most used.

    FAT32 has certain limitations since it cannot store files of more than 4 Gbytes, and it does not allow the creation of partitions of more than 8 Tbytes. It is also problematic when using many levels of subfolders and lacks certain security-level features found in more modern file systems. That is why it is recommended to use others such as NTFS in operating system installations.

    However, its simplicity, versatility, and compatibility with other operating systems (Linux, macOS, Android, or other alternatives such as FreeBSD) make it especially suitable for external/removable storage drives such as USB sticks or microSD memory cards.

    FAT32 on Windows

    The problem is that the standard tool present in Windows 10 or Windows 11 to format disks (the function that we can find in the file explorer when right-clicking on a connected drive) does not allow using this file system. If you try, you will only see the option of exFAT or NTFS. In addition, previous systems that did offer it did not allow to format drives with storage capacity superior to 32 Gbytes.

    I tinker a lot with all types of equipment, and I cannot miss a USB stick or a microSD with this type of file system, the most compatible and suitable for use on devices that do not support others or work worse. I am thinking of testing software, working with the Raspberry, or updating the TV box firmware, to name a few examples. If this is your case and you ever find that you need to use FAT32, there are methods to overcome the situation.

    Third-party tools

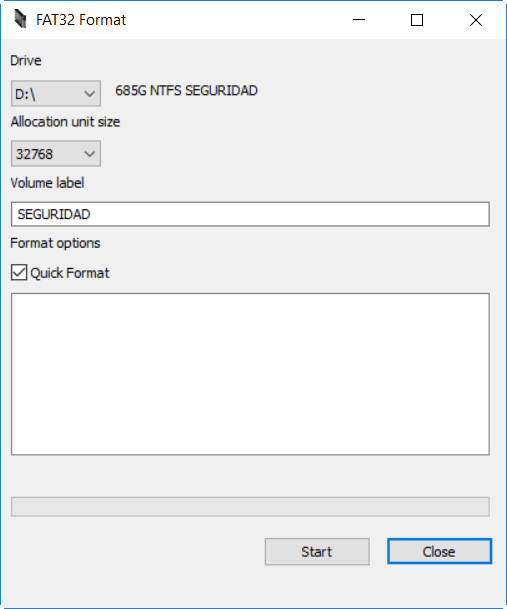
    One of those available is FAT32 Format. A free and portable application that does not need installation and facilitates the task of formatting drives with these types of files. : download (Start button on the link), run, select the drive, activate formatting (it has a quick format option), and start.

    Powershell

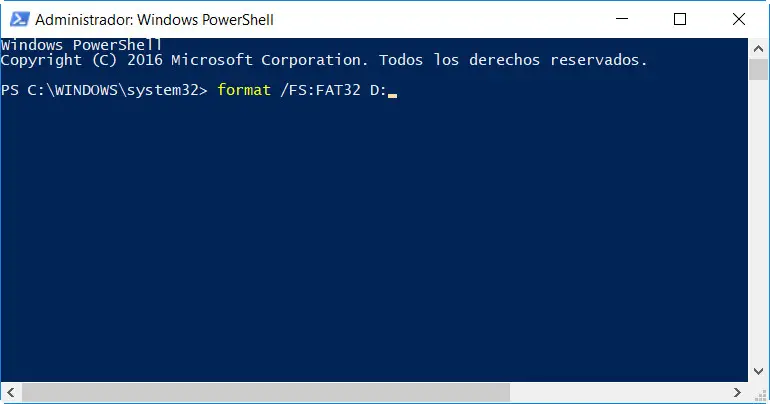
    Applications like the previous ones are recommended for ease of use and speed of execution. Still, if you want to use Windows itself, another method overcomes the limitation of the standard formatting tool. Access the advanced Windows Powershell console and use the command ” format / FS: FAT32 X:” where “X” is the drive we want to format:

    The consoles will take much longer to perform the formatting and are more complicated to handle, so we recommend using the FAT32 Format application. In both cases, remember that the handling of individual files in FAT 32 is 4 Gbytes. The theoretical limit of the drive capacity with this type of file system is 16 TB, more than enough for the entire base of devices on the market.

    exFAT: better, but less compatible

    exFAT was introduced in 2006 and raised in Windows XP and Vista. As its name indicates, it is related to the FAT file system. It is specifically an evolution of this that tries to eliminate the limitations that FAT32 presented, although without introducing many of the improvements present in NTFS.

    The main advantage of exFAT compared to its predecessor is that it eliminates storage limitations, can create larger partitions and allows storing files of more than 4 Gbytes without losing one of the outstanding characteristics of FAT, the reading speed and writing.

    Like FAT32, exFAT is ideal for pen and external drives in general, with special mention to devices with more than 16 Gbytes of capacity. However, FAT32 offers more and better compatibility with a broader range of systems. Therefore that exFAT is relegated to specific contexts.

  • How to download Windows 11 ISOs and the main uses of disk images

    How to download Windows 11 ISOs and the main uses of disk images

    Microsoft released the first Windows 11 ISO last week, although there were already other alternative ways to get it, as we saw in the Windows 11 Installation Guide. It is another step that brings us closer to the launch of the final version that we expect by the end of the year.

    If you are unfamiliar with this type of “image,” you should know that it is a sector-by-sector copy of the official OS installation/maintenance DVD, created as a disk image file that can be downloaded, stored, and transported.

    You will find this type of image on the Internet as a single file with a .iso extension (the most used format, although there are others) and for any software, operating systems and applications, games, or other multimedia content.

    In the case of operating systems, they are handy and allow several uses that we will review at the end focused on the new Windows 11. We have to warn that the version is still under development, in a preliminary phase (beta), and should only be used for tests discarding for the moment teams dedicated to production since its total stability is not guaranteed.

    How to download the Windows 11 ISO

    Official Website

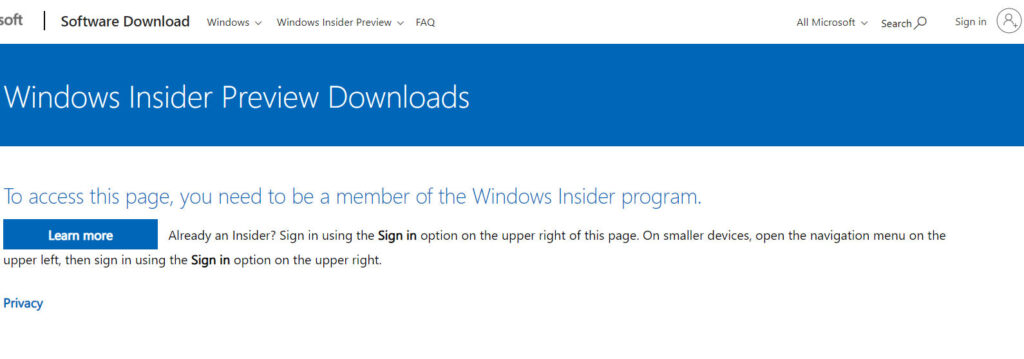
    Microsoft does not offer these images to the general public but reserves them for the Insider trial program subscribers. You only need a Microsoft ID account. We see the step by steps to obtain it:

    • If the page does not authenticate, identify yourself with your Microsoft ID account.
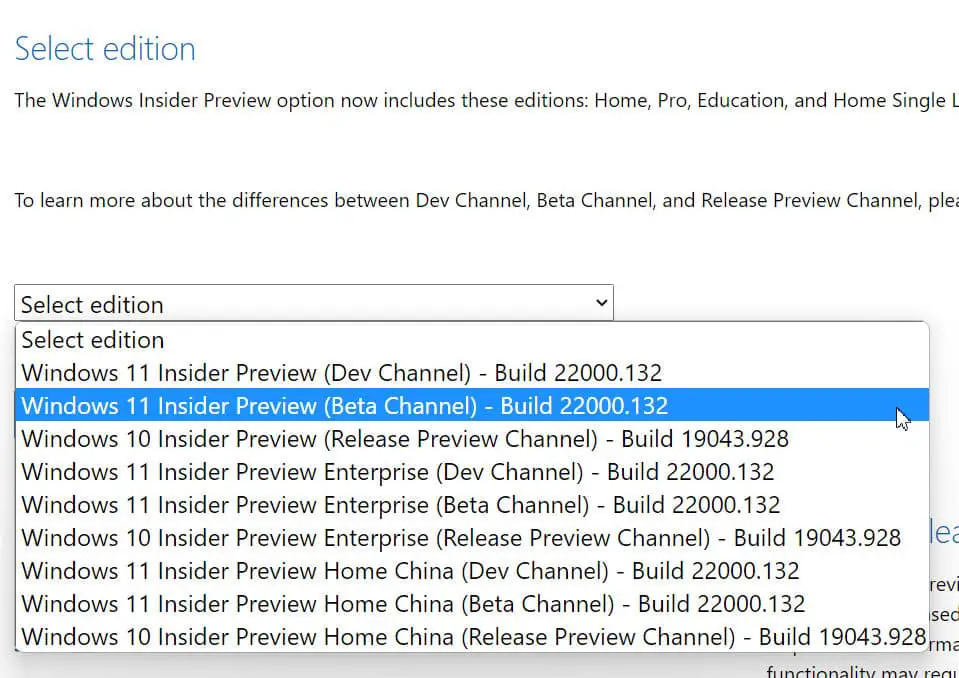
    • Select the version of the Insider Preview to build 22000.132. (We recommend the beta version, somewhat more stable than the development channel)

    • Select the language.
    • Download the resulting file “Windows11_InsiderPreview_Client_x64_es-en_22000.iso”.

    Alternative 1

    uupdump.net is a third-party site that offers a script to download the necessary files and convert them to a Windows 11 ISO. It is what we have been using before Microsoft officially provided the images. The files with which the ISO is created are official from Microsoft. As follows:

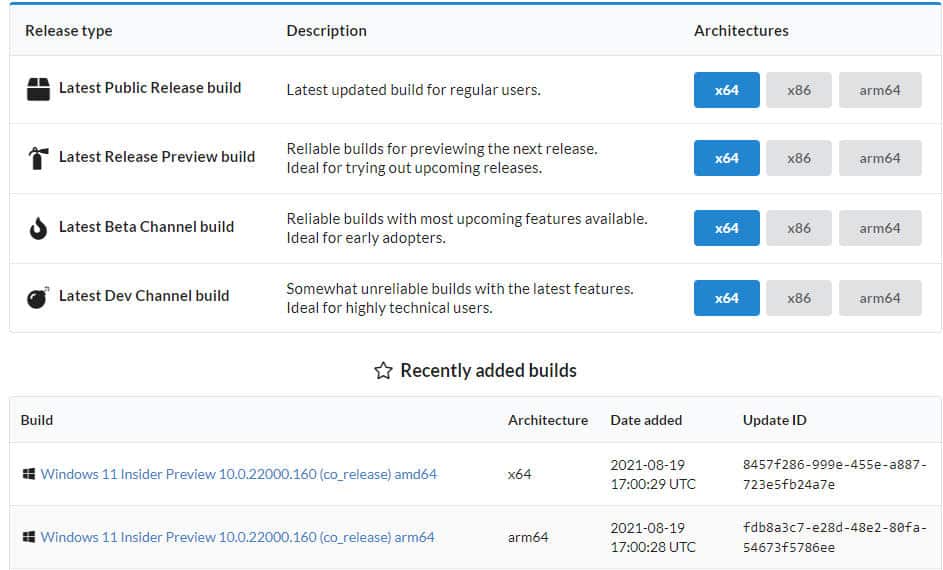
    1. Navigate to uupdump.net. The page offers versions in various channels to download, development (more advanced in the timeline), or beta (somewhat more stable) less stable) on multiple architectures.
    2. Below you will see the latest builds added. Select “Windows 11 Insider Preview 10.0.22000.160 (co_release) amd64”.

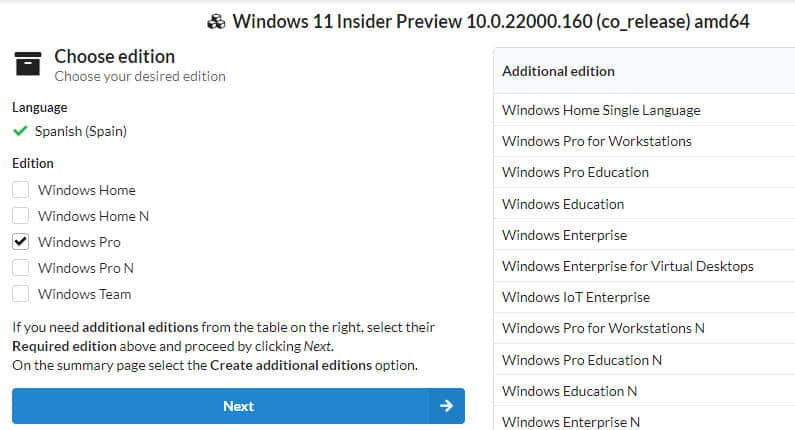
    3. Click on it to select the Spanish language and the edition you prefer (Home or Pro).

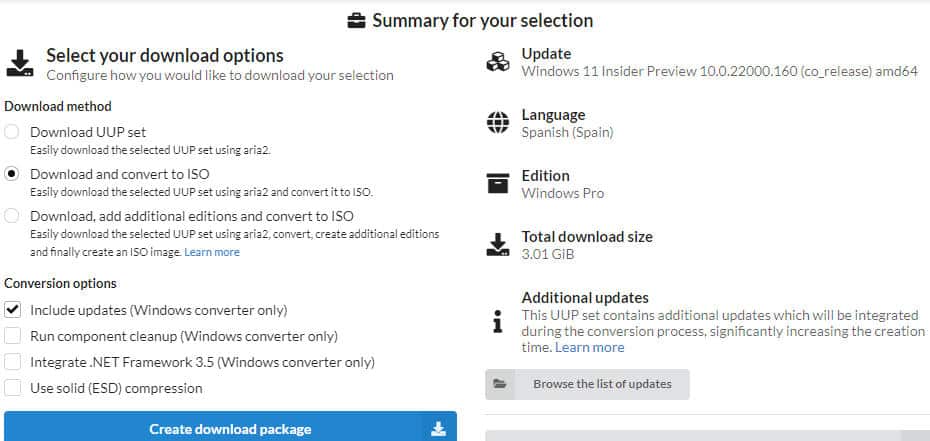
    4. Select the download option: «Download and convert to ISO» to obtain a compressed ZIP file that will be used to get the image.

    5. Unzip the file to a folder on your disk.

    6. Go to the folder and double-click on the “uup_download_windows.cmd” file.

    7. When you run the file, you’ll see a command prompt window open and a batch file run, downloading all the necessary files from Microsoft and doing a packaging that will create the Windows 11 ISO file.

    Once Microsoft has started offering official images, the previous method is faster and easier than this one, but there you have it in case the other one fails you or if you don’t have a Microsoft ID account because this method works for any user.

    Alternative 2

    Microsoft also offers these files in other professional portals such as TechBench or the TechNet evaluation center, but you have to be subscribed to them. A developer has a great little app that we’ve been using for years to download images (both Windows and Office). The photos are official, the same ones offered by Microsoft, and are accessed as follows.

    • Access the Heidoc.net page and download the “Windows ISO Downloader.exe” application. It is portable, and it does not need installation.
    • There you will have access to Windows 7, 8.1, 10, and 11. Also, to the Office suite from version 2007 onwards and the versions for Mac.

    Only the Windows 11 SDK is available, but it will inevitably be updated with the available images. Ideal for getting older Windows or Office images.

    Windows 11 ISO uses

    Clean facilities

    Performing installations “from scratch” of the operating system is one of the primary uses. Before doing so, we will have to burn the disc image on a DVD (better on a USB stick) in a process known as “burning.” If you follow us, you should know it by heart. We review it:

    1. We use our favorite application, Rufus, which is free and works perfectly primarily with Windows images.
    2. Download and install. (You can also use the portable version)
    3. Insert the medium that you will use in the recording. You can use a DVD, but we recommend a pen drive or
    4. USB disk, faster and safer. Its minimum capacity must be 8 Gbytes.
    5. Run Rufus. You will see a straightforward interface in which you will first have to select the Windows image downloaded in the previous steps by selecting the “Boot choice.”
    6. It only remains to configure the rest of the options. GPT as “partition scheme,” target system “UEFI (not CSM), and NTFS or FAT32 as a file system. Click on start to get the installation media.

    Upgrades

    Another use of the media that we have created from the Windows 11 ISO is to perform updates from Windows 10, just as it is done from Windows Update. If you do, keep in mind that you will have to link the license to the new operating system and use a Microsoft ID account because, at the moment, it is only officially available to Insiders testers. If you try Windows 11 and don’t like it, or you want something more stable until the final version is released, you have ten days to go back to Windows 10 in a process carried out from the Configuration tool.

    Third teams

    The Windows 11 ISO or the created media can also be used on other computers, either for “clean” installations from scratch or to perform updates from Windows 10. The process is the same as if we do it on our computer.

    Maintenance

    The medium (we recommend creating it on a pen drive or USB disk rather than on a DVD) is used for installations/updates and system maintenance. These means are ideal for problem-solving, removal of malware, firmware update, the uninstallation of problematic drivers, applications, system updates, and in general scenarios where the system does not work or does not start correctly. The options are similar to the recovery functions within the system.

    Virtual machines

    Virtualization is a fast, comfortable, and safe method for executing software. It is especially indicated for testing unstable systems or applications such as Windows 11 since it does not affect the installed operating system that you use on a day-to-day basis and, in addition, it does not It is limited to Windows and offers the ability to test Windows 11 from a Linux or macOS machine.

    Also, the media creation step is not required, and the downloaded Windows 11 ISO is used directly, loading it into some of the available commercial or free virtualization solutions. 

  • How to install Windows 11 on VirtualBox

    How to install Windows 11 on VirtualBox

    VirtualBox is an application that allows you to create virtual machines to run complete operating systems. The most recent released by Microsoft, Windows 11, does not allow it to be used in a virtual machine officially. However, there is a way to install Windows 11 on VirtualBox.

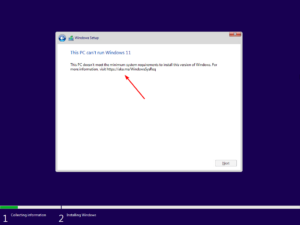
    If you have already tried creating a virtual machine and installing Windows 11 in VirtualBox, you may have noticed that an error appears during the process. Specifically, it mentions the following: “This computer does not meet the minimum system requirements to install this version of Windows.” And that’s it. That’s where the installation ends. Or not?

    How to install Windows 11 in VirtualBox bypassing the “Does not meet the requirements” error

    The first step to installing Windows 11 in VirtualBox is downloading this tool on your computer if you haven’t already done so. You can do it by visiting its official page and using the download link corresponding to your operating system. Once you have VirtualBox, launch it and click the New button that you will see at the top of the screen.

    Setting up the virtual machine in VirtualBox.

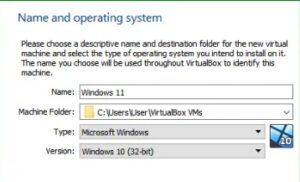
    Choose the machine name, version, and type using the virtual machine creation wizard. We must clarify that we have used the term “Windows 2” because we already had another virtual machine with Windows 11. But you can choose the term that suits you best. Copy the rest of the settings from the following image:

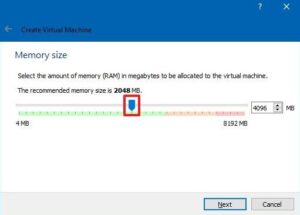
    Provide at least 4GB of RAM. However, you can add more memory to your virtual machine if your computer allows it.

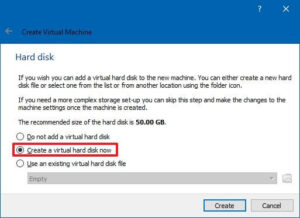
    Now is the time to create a virtual hard disk. Choose the option Create a virtual hard disk now and press the Create button.

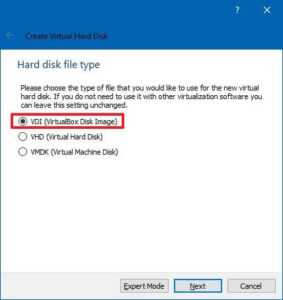
    Check the VDI option and continue with Next.

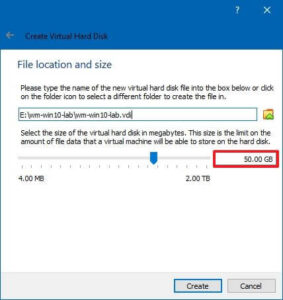
    Allot a space of at least 50 GB for your virtual machine. Again, if you can give it more, go ahead.

    With your virtual machine created, now insert the Windows 11 CD. Of course, in this case, you will use the ISO that you must obtain from the official Microsoft website. Click on Optical drive, and in the context menu, click on Select a disk file.

    Browse using the file explorer until you find the Windows 11 ISO.

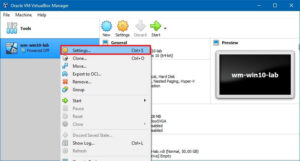
    Next, click on the Settings button, located next to New and Discard at the top of the options.

    Open the System section, click on the Processor tab and assign two CPUs to the virtual machine. Also, check the boxes that you will see next to Extended Features.

    Install Windows 11 in VirtualBox step by step

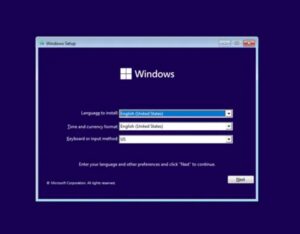
    Start the virtual machine and wait for the Windows 11 installer to load. Select your language, time format, and keyboard layout. Then click  Next

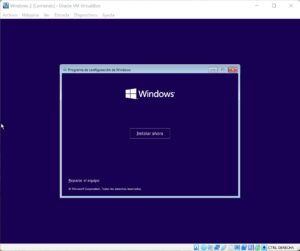
    Use the Install Now button to continue.

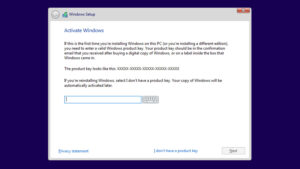
    Click on  I don’t have a product key to skip the Windows 11 activation step.

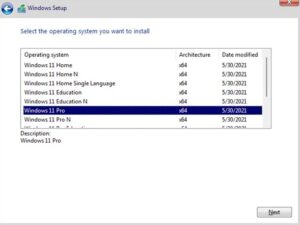
    Choose the edition of Windows that you want to install on your virtual machine.

    Finally, the error that we mentioned at the beginning of this article will appear on the screen. Fortunately, all is not lost.

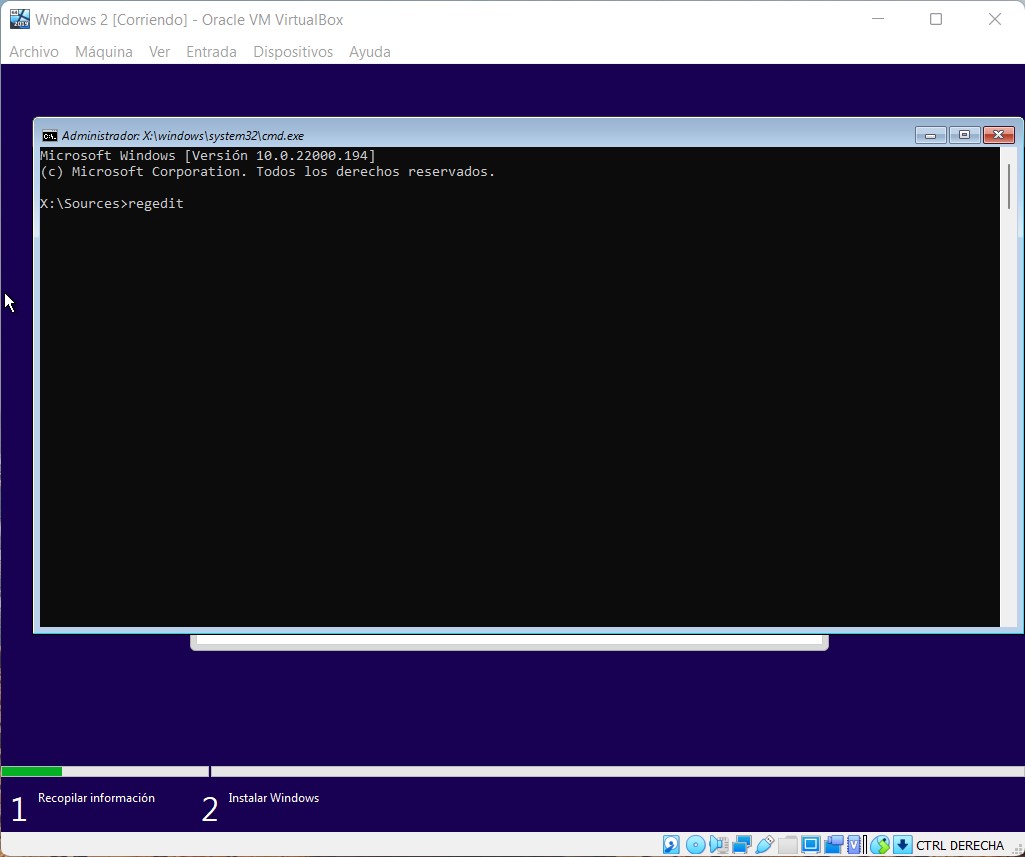
    Use the combination Shift + F10 to open the system console. There type Regedit and hit Enter.

    How to install Windows 11 on VirtualBox

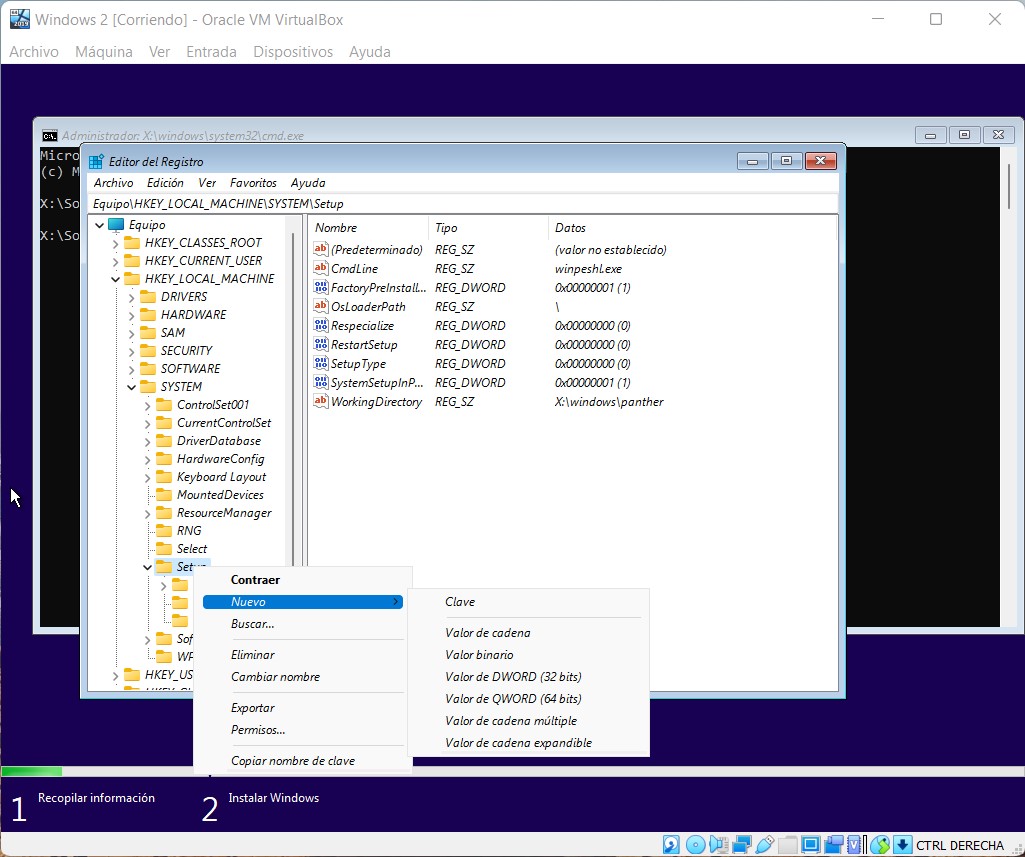
    The registry editor will appear on the screen. Navigate with the side browser to the following route:

    • Computer \ HKEY_LOCAL_MACHINE \ SYSTEM \ Setup

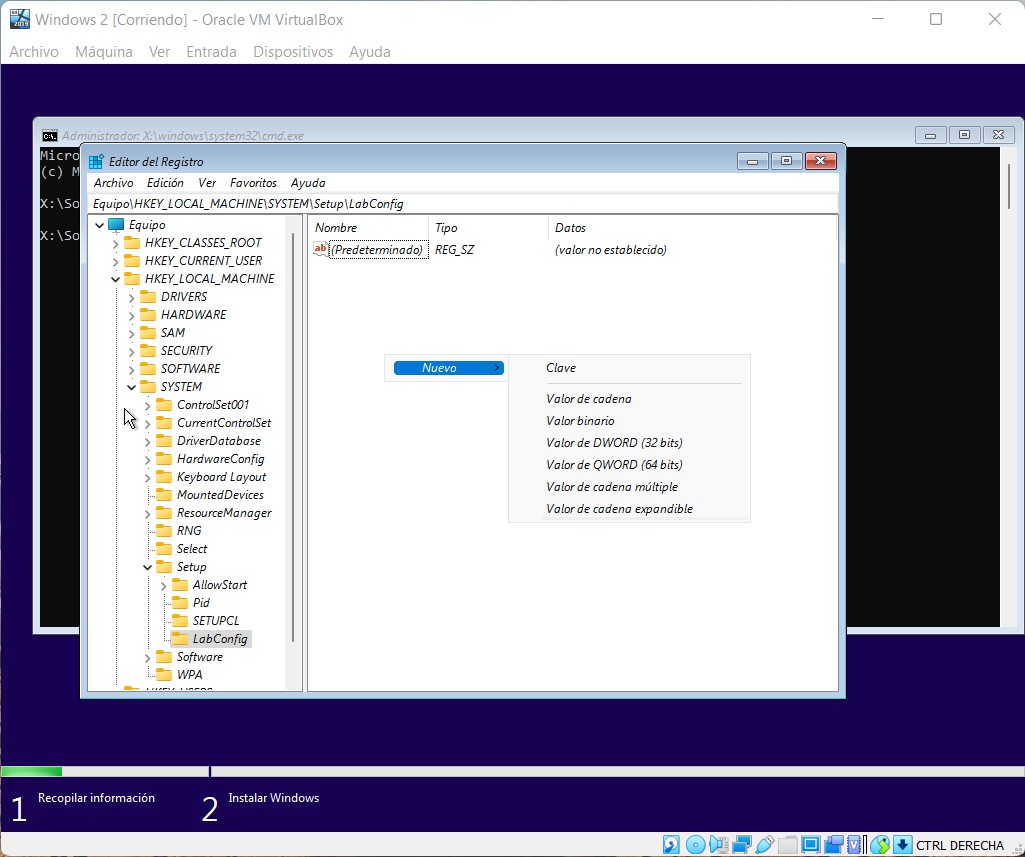
    Right-click on the Setup key, open the New menu and click on  Key. Name the new key LabConfig. Make sure it is nested within  Setup.

    How to install Windows 11 on VirtualBox

    Open  LabConfig, the new key you have created, and right-click on a space to see the context menu. Select the DWORD Value (32-bit) option.

    How to install Windows 11 on VirtualBox

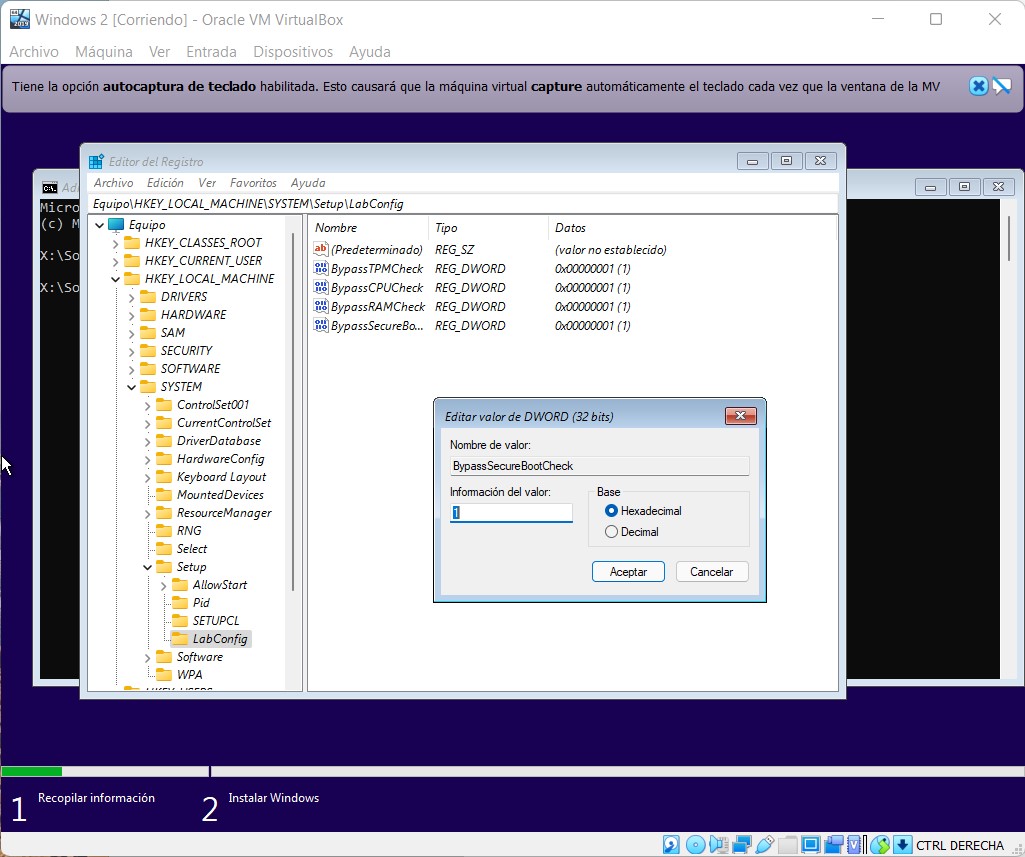
    Create four 32-bit DWORD values ​​named as follows:

    • BypassTPMCheck
    • BypassCPUCheck
    • BypassRAMCheck
    • BypassSecureBootCheck

    Then, access each and set the Value data field to 1. Use the following screenshot as a guide to check that you are carrying out the entire process correctly.

    How to install Windows 11 on VirtualBox

    Close the registry and the system console. Then, click on the cross in the installation window. Select OK to confirm that you want to exit the installation in the pop-up dialog.

    Again, you will find yourself at the beginning. Use the Install Now button and repeat the steps already mentioned.

    Unlike what has happened before, you will jump to the window that shows the Windows 11 contract, which must be accepted instead of the error.

    accept the license agreement

    Use the Custom option: install Windows only (advanced) to continue.

    select custom install

    Create a new partition and select it to install Windows 11 on it.

    choose the installation drive and click Next

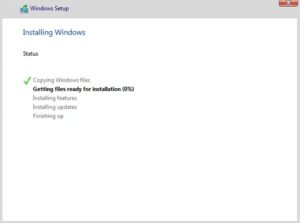
    Finally, the installation process will start.

    Wait for the wizard to finish and the virtual machine to restart. The duration of the installation will depend mainly on the power of your computer. However, Windows 11 will likely terminate before copying all the files necessary to function virtual machines.

    After installing Windows 11 in VirtualBox, finish setup

    After taking the steps mentioned in the previous section, Windows 11 will be installed in your virtual machine. All you have to do is finish setting up the system by indicating the language keyboard layout and adding your Microsoft account.

    Once you finish, you will have a fully functional copy of Windows 11, thanks to VirtualBox. Remember that the process described throughout this guide is compatible with all operating systems. That is, you can have a virtual machine with Windows 11 by following the steps mentioned in Linux, Windows 10, Windows 11 itself, and macOS (as long as it is not on a Mac with an M1 processor).Choose location

    Once you finish, you will have a fully functional copy of Windows 11, thanks to VirtualBox. Remember that the process described throughout this guide is compatible with all operating systems. That is, you can have a virtual machine with Windows 11 by following the steps mentioned in Linux, Windows 10, Windows 11 itself, and macOS (as long as it is not on a Mac with an M1 processor).

    How to install the VirtualBox Guest Additions

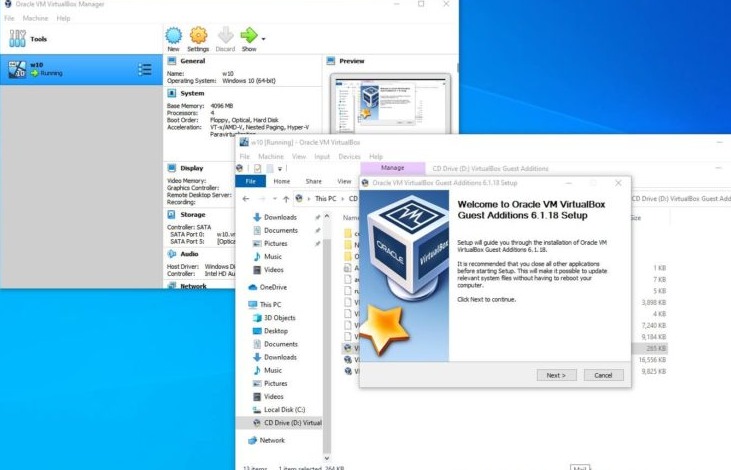
    VirtualBox Guest Additions is the package of tools provided by VirtualBox to improve the compatibility of the virtual machine with Windows 11. For example, the network drivers or the virtual graphics card are installed. The latter is very important because they allow you to adopt the resolution of the virtualized system to the size of the VirtualBox window. Plus, you’ll gain some features like clipboard integration and support for USB-connected drives. To install them in Windows 11, do the following:

    1. Open the Devices menu.
    2. Click on  Insert the Guest Additions CD.
    3. Open the file explorer on your virtual machine and explore the CD drive.
    4. Click on the executable to install the drivers.

    When the process is complete, the virtualized copy of Windows 11 will be more compatible with VirtualBox. Although this last step is optional, it is highly recommended due to the large number of functions it adds.

    And you, do you think it is practical to have a virtual machine with Windows 11? Are you going to use this trick to test Microsoft’s new operating system, or do you prefer to install it on your disk?

  • A special look is coming to Windows 11

    A special look is coming to Windows 11

    Microsoft is constantly improving Windows 11, which includes upgrading the operating system. Some users have already seen another such effect.

    Those who have been using different versions of Windows for a long time are well aware of the small changes that have been made to make the system look more spectacular. However, these effects have slowed down the devices but noticeably reduced performance.

    That’s why an innovation called Mica is an exception, which is a striking effect behind the windows that Microsoft claims require only a thimble of power. This allows the user to use it more confidently, as turning on the product does not significantly reduce the tempo of the device.

    © Windows Latest / Mayank Parmar

    Windows Latest has come to a similar conclusion that a phenomenon called Mica appears in more and more users. This was not the case before. Microsoft has just started introducing the feature in the last few days/weeks. Since then, however, it has appeared in more than one piece of software within Windows, including Paint, Calculator, the Edge browser, and now Word. But what exactly does Mica do?

    The display adjusts the windows to the colors of the desktop wallpaper and highlights the currently running and active software. The development is not only spectacular, but it is also helpful, and the best: it only slightly slows down the machine.

  • Microsoft to change the Windows 11 Start menu

    Microsoft to change the Windows 11 Start menu

    Microsoft wants more freedom to customize the menu than it currently does.

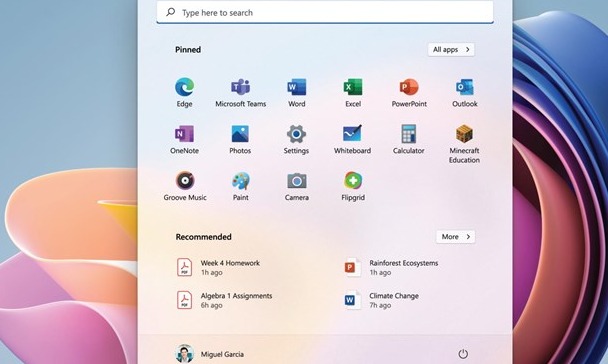
    Windows 11 has brought a significant design change over Windows 10 – at least as far as the Start menu is concerned. However, Microsoft wants the most important part of the operating system to be more formable than it currently is, so an upcoming update – build 22509 – includes some changes in this regard.

    The Engadget According to reports, after the update, the user can decide whether you want to see more of the menu to set the recommended applications or files. Windows 11 currently balances the two. However, this does not mean a return to Windows 10 Startup – which some users would otherwise want to achieve. Microsoft has previously emphasized that it follows the principle of minimalism in Windows 11, which the previous design does not fit into.

    © Microsoft

    The company will also bring the time and date back to the Tray. For now, the update will only be available to Insider users, but not to everyone.