Category: HOW TO

How To News & Features and also Get the Latest News and Features and guidelines on Windows and many more from How-To Section

  • 3 Simple Methods: How to Capture a Screenshot on a Mac

    3 Simple Methods: How to Capture a Screenshot on a Mac

    Screenshots are a vital part of our everyday lives, and learning to do them fast might be helpful too. You can snap stills of nearly anything on the screen, whether it’s an ordinary workday or online lessons. These screenshots may be saved in JPG or PNG format and sent to your group via multiple channels.

    We decided to provide you with some advice regarding the newly released Windows 11 operating system. This essay will show you how to take on your macOS computer. Apple’s operating system for the MacBook Air, Pro, and iMac allows you to snap screenshots in four ways.

    How to take a screenshot on macOS

    Depending on the kind of screenshot you want, there are four simple ways to take one on a macOS device:

    1. How to capture the whole screen on a Mac

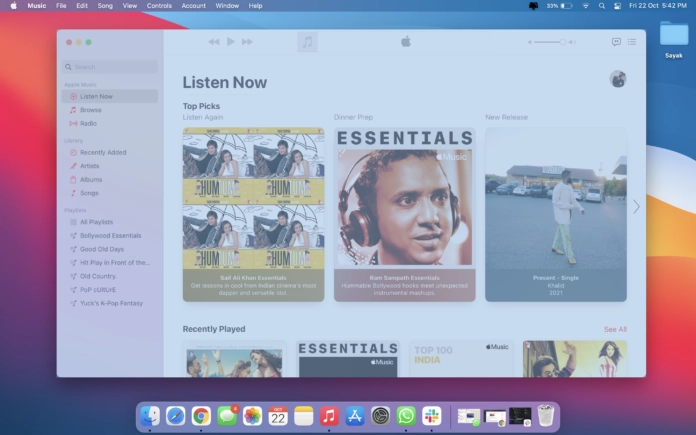
    Command + Shift + 3: Clicking Command + Shift + 3 will bring up the full-screen option. This allows you to capture the full screen. It resembles the Print Screen key seen on Windows computers.

    You should see your screenshot appear in a new window. You may either click on it to edit your snapshot or wait a little while for the window to close and save your screenshot.

    2. How to screenshot a specific area of the screen

    Command + Shift + 4: To do this, you must use a somewhat more complex technique. Command + Shift + 4 is the default shortcut for taking screenshots of particular screen areas. After pressing the keys above, a crosshair would emerge, allowing you to click and move the crosshair over the screen area you wish to capture.
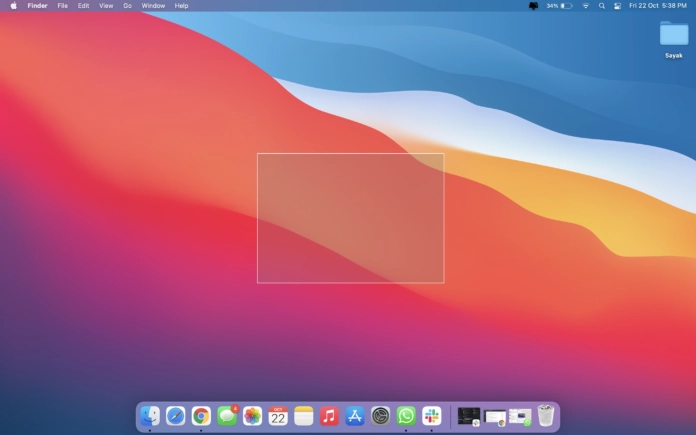
    mac screenshot

    3. How to screenshot a window or a particular program

    You may use the button combination Command + Shift + 4 and then click Space to take a screenshot of a specific window or application. The crosshair will be replaced with a camera icon, allowing you to take screenshots of a particular window.
    mac screenshot

    To take a screenshot on a macOS laptop or computer, use Command + Shift + 5. The advantage of this approach is that all functionalities are available in one location. After pressing the combination, a pop-up bar with various functions emerges. You may capture a screenshot of the whole screen, a specific area, a window, or an app. Furthermore, you may record the entire screen or a specific area using the panel. By using the Escape key, you can leave it.
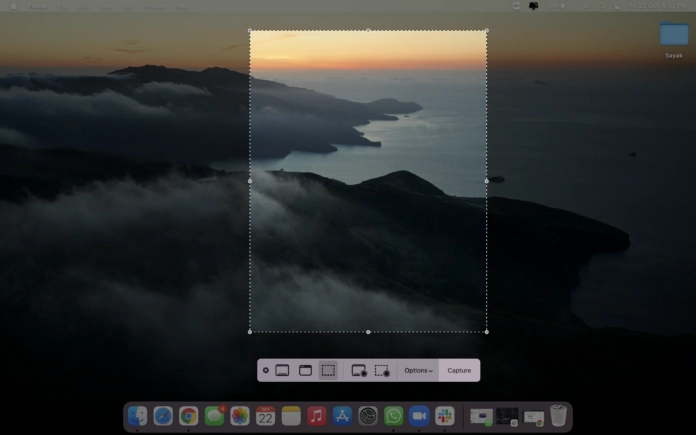
    mac screenshot 2

    Shift + Command + 6: The Touch Bar on your keyboard might provide an additional method to take a screenshot if you use a MacBook Pro from 2016 or later. You may quickly access screenshot shortcuts on your Touch Bar by pressing Command + Shift + 6 to bring up your keyboard.

    On macOS PC, where are the screenshots saved?

    Shots taken on your macOS device are default saved to your desktop. However, you may alter the place where your snapshot is saved. When you press Command + Shift + 5, a window will appear with an Options button. You may pick Other Location from the Save to part of Options and a folder section of your choosing.
  • How to Troubleshoot an Offline Printer

    How to Troubleshoot an Offline Printer

    Your printer has received several files but has not printed any of them. The printer’s status is displayed as “Offline” in the Windows Settings menu. What does this indicate, and how can you resolve a PC printer locked in the offline state?

    Any reliable modern printer can establish an Ethernet or Wi-Fi connection with your computer. What should you do if you see the dreaded “printer down” status error? How do you reactivate your printer? Or maybe it just shows the standard Generic Code 10 error?

    How to Troubleshoot an offline Printer

    1. Verify the Printer and Computer Connection

    Check that the printer is connected to the power outlet properly and turned on before making any changes to the PC’s settings. Ensure your PC and printer are on the same network when using wireless printers.

    Next, make sure your network is operational. It’s not the printer’s fault if you are having problems connecting to the internet. In that scenario, our advice on resolving Wi-Fi issues in Windows 10 will come in handy.

    2. Turn off Windows’ offline printing mode

    Moving forward, you must also ensure that the printer is not set to “Use Printer Offline.

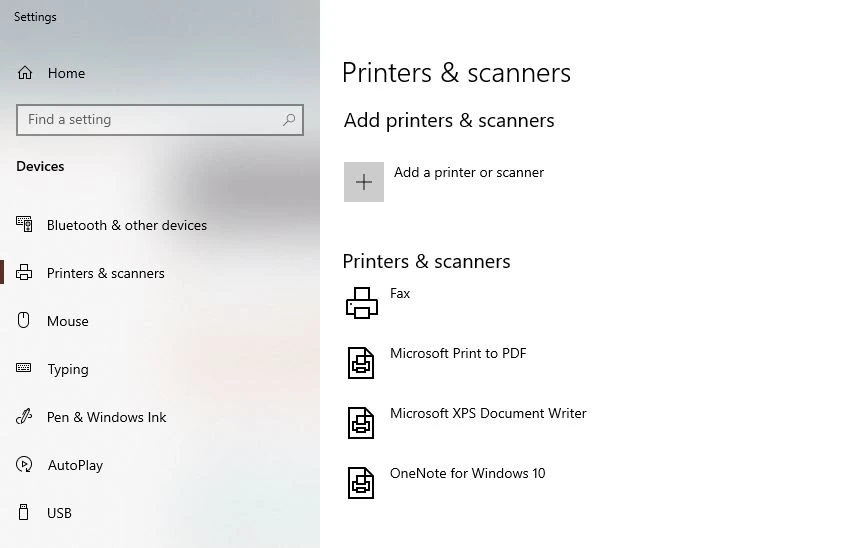
    • Select the faulty printer under “Printers & scanners” by going to Settings > Devices > Printers & Scanners.

    printer offline

    • Select Open queue.


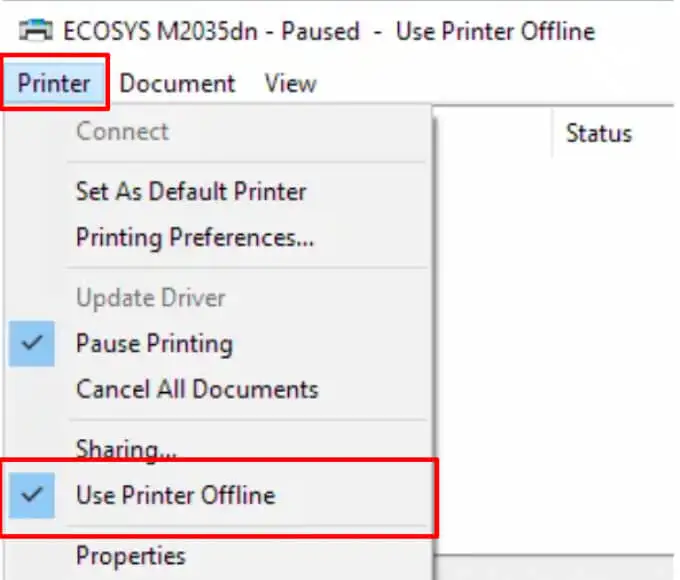
    • Ensure “Use Printer Offline” is ticked when you choose Printer from the menu bar. To put the printer back online, choose Use Printer Offline if the option has a checkmark next to it.

    offline printer

    3. Launch the printer troubleshooter

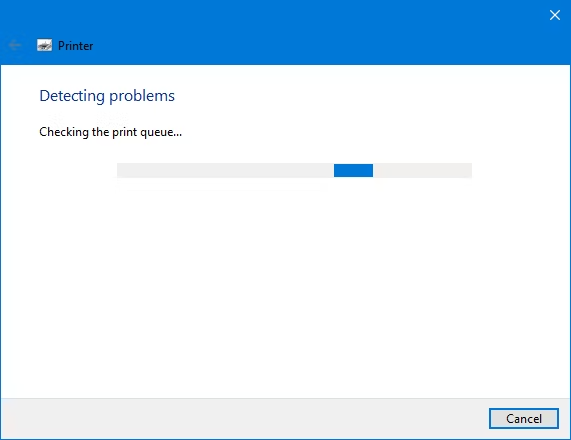
    Let the Printer Troubleshooter assist you if you still can’t get your printer online. It is an integrated utility that detects and resolves printing-related issues on Windows-based devices.

    printer troubleshooter

    There are several troubleshooters in Windows 10 that are designed to find and fix any problems. You can try running a printer troubleshooter in the hopes that it will resolve the offline printer problem.

    To access Settings, press Windows key + I, then select Devices > Printers & Scanners. Click Run the troubleshooter under Related settings on the right-hand menu.

    4. Launch the Print Spooler Service again.

    A service that manages communication with the printer is called the print spooler. You can bring your printer back online by restarting this service.

    print-spooler-service

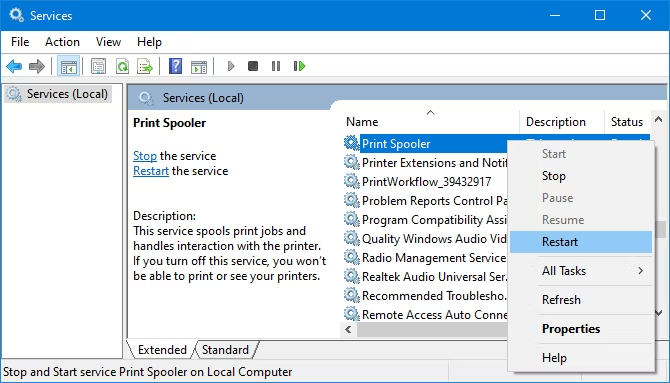
    Search for Services in the Start menu, then launch the appropriate app. When you find Print Spooler in the Name column, continue to scroll down. Right-click it when you locate it and select Restart.

    5. Restart the Printer and Computer

    Another potential cause of the issue is a temporary computer system error. Shut down your computer, then turn it back on after disconnecting or unplugging the printer. Turn off the printer, wait a few seconds, then turn it back on if nothing else has worked. Alternately, unhook the printer’s power cord, wait a bit, and then re-plug it.

    6. Clear the Print Queue

    The offline printer error is just one of several problems that a backed-up print queue can bring.

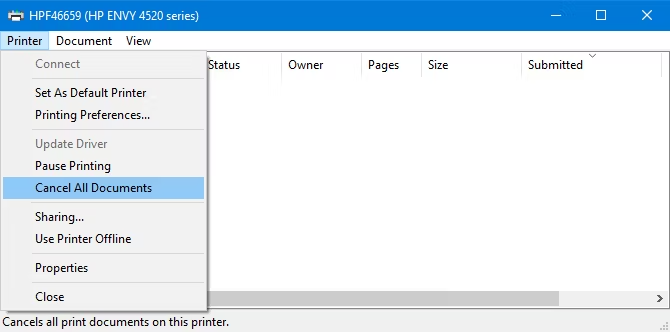
    Press Windows key + I to access Settings, select Devices > Printers & scanners, choose your Printer and click Open queue to empty the print queue.

    Go to Printer> Cancel All Documents on the top toolbar.

    printer cancel

    7. Update the Printers Drivers

    It is unnecessary to update your drivers if your machine is working correctly. The offline printer is one such instance when updating the drivers may be helpful. Nevertheless, you do occasionally need to identify and install outdated drivers.

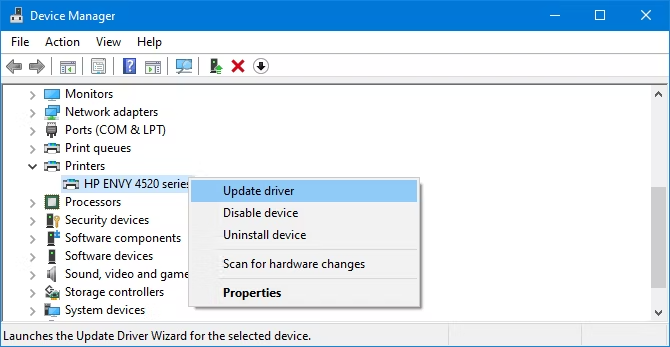
    Press Windows key + X and choose Device Manager to do this. Double-click the Printers category in the new window. Click Update Driver from the context menu of your printer. Double-check the printer manufacturer’s website if no updates are discovered (be it HP, Canon, Brother, or whoever).

    8. Remove and Reinstall the Printer

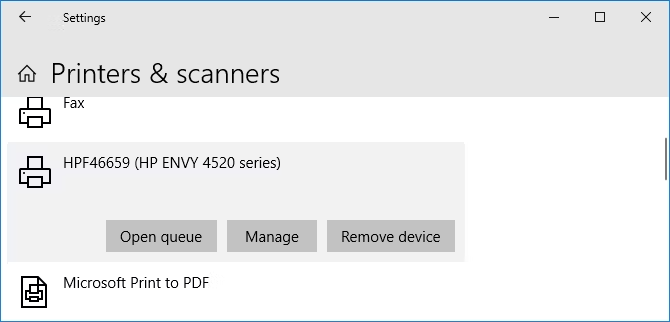
    The printer can be removed from your computer if all else fails. To access Settings, press Windows key + I. Navigate to Devices > Scanners & Printers.

    remove printer

    Click Remove device after selecting your printer, then select Yes. Click Add a printer or scanner after that. Return the printer’s connection to your computer by following the wizard’s instructions.

  • How to Download Youtube Videos Using 4K Youtube Video Downloader

    How to Download Youtube Videos Using 4K Youtube Video Downloader

    You will be inundated with connections to software and apps if you search for video downloading software on Google. These links claim to be the most excellent video downloading software available.

    However, once you use a few of those programs, you’ll see that the majority of them are useless, offering you adverts rather than assisting you in downloading high-quality videos. Because it makes video downloading simple and automatic, the 4K Video Downloader is genuinely a breath of fresh air. As we evaluate the program to determine if it lives up to its claims, we’ll look at all of 4K Video Downloader’s capabilities in this article:

    READ ALSO: Windows 11: How to free up and fix high Memory Usage

    The Benefits of 4K Video Downloader

    • Videos in 3D and HD

      You may quickly download videos with an 8K resolution using your smartphone’s 4K Video Downloader. Additionally, you can instantly download 360-degree or 3D videos to your mobile device. You only need to copy and paste the video’s URL and choose the appropriate quality. Click here to continue to the YouTube downloader tutorial and learn more.

    • Playlists

      Separately downloading videos take a long time. We know that you have other commitments and cannot devote much time to this. As a result, you can run several downloads by making a YouTube playlist. You can use this program to download the entire playlist’s videos at once. Therefore, you have two options: create your playlist or pick from one of the many others already on YouTube.

    • Smart Mode

      By tapping the widget, a user in smart mode can download any video. This will enable one-click downloading of the videos. All you have to do to get it to start appearing on the Chrome tab is to enable Smart Mode. Go to any video on the internet that you wish to download right now. The smart mode will become available as a download option once it begins streaming. Download the video to your device at the quality of your choice.
    • Subtitles

      For non-native speakers, subtitles are heaven; if you are one of them, we know you require subtitles. While streaming, YouTube videos include subtitles, but if we told you that you could download the videos with automatically created subtitles, you wouldn’t believe us. You can download videos and subtitles separately using a 4K video downloader. By looking through the. Srt file for the relevant video’s subtitles. You can add subtitles from the VLC media player.

    • Language Assistance

      The software supports many worldwide languages, so you can still use it even if you don’t speak English. Select one of the languages listed in the tab under settings. This will translate the text into the language of your choice. Don’t take this to mean that the audio in downloaded videos will change. You can only use this feature to make the software easier to use.

    • YouTube Videos

      Even more challenging to stream is the private content on YouTube. However, thanks to this app, you can now download and stream it wherever you like. Download these exclusive playlists and videos without concern. End your concerns about lags when viewing videos and begin downloading them in high definition (8K).

    READ ALSO: How to fix: Netflix won’t play at 4K

    How to Use 4K Video Downloader to Download YouTube Videos

    When utilizing this software, downloading videos from YouTube is a relatively simple process. To begin, adhere to these easy guidelines.

    1. Download and Install the Software

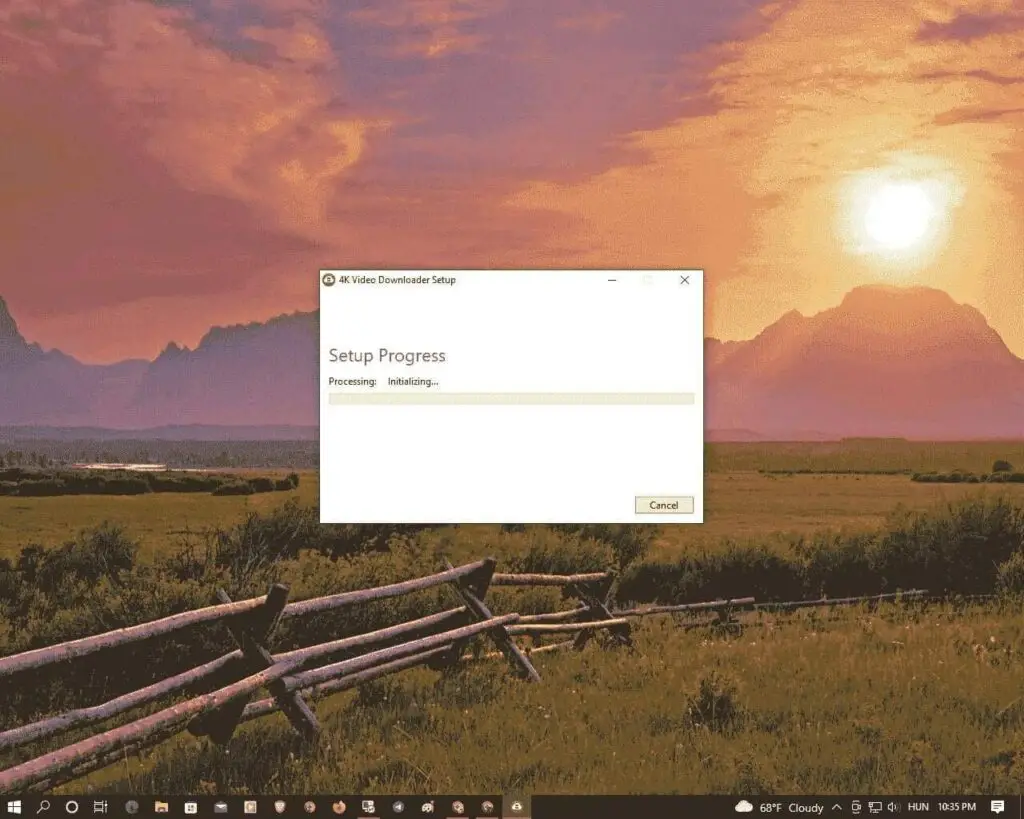
    The program is accessible for Windows, Linux, and macOS. Select your favorite version from the 4K video downloader’s website based on your system requirements. The next step is installing it by clicking the downloaded setup.

    4k video downloader software

    2. Copy the link from the browser

    The link to the page you are viewing is located at the top. You can copy the link to the video that you wish to download. When you’re finished, proceed to the next step.

    3. Paste the URL

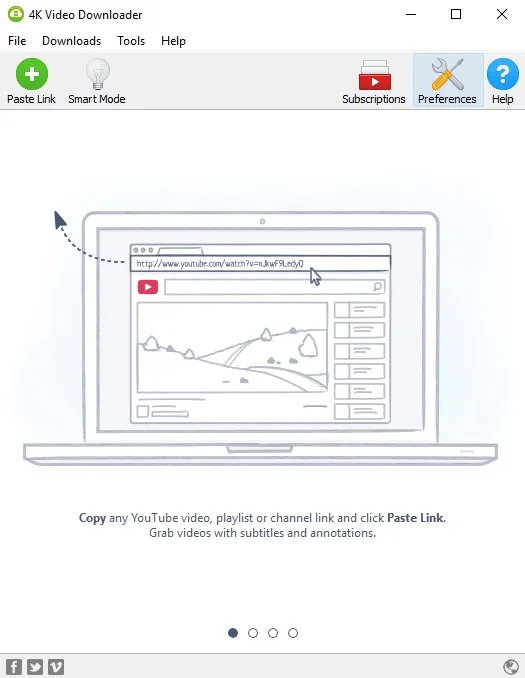
    Open the 4K YouTube downloader software and seek the “paste URL” option. Continue by pasting the URL into the option that will display.

    youtube video downloader

    5. Choose the best quality

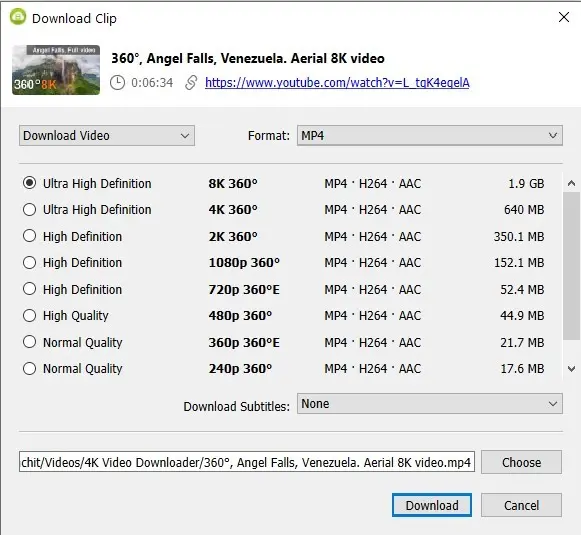
    After you’ve pasted the URL, choose the quality. A new box will appear, and you may use it to select the quality that best suits your needs. You can use the 8K resolution for the most satisfactory results.

    youtube video downloader

    Conclusion

    Only when utilizing a 4K Video Downloader is downloading a YouTube video quite easy. Enjoy HD videos on your PC by following the previously given instructions. You can watch them whenever and anywhere you choose. Put it on repeat or a playlist you got from the application for a lengthy ride.

  • How to Use and Access the Spotify Web Player

    How to Use and Access the Spotify Web Player

    With Spotify, you can listen to music on your desktop or mobile device. You can use the Spotify app to listen to your favorite music on these devices. The service also offers a web-based player, which is less well-known. With Spotify Web Player, you can access all your music using your web browser on your PC. You no longer need to download the Spotify app to your device to use this player. You only need a web browser and a Spotify account to listen to your favorite music.

    A web browser, such as Google Chrome, Mozilla Firefox, or Opera on your computer can be used to access this online player. It functions substantially like a desktop application. This site does not support Safari at this time.

    How to Access Spotify Web Player

    The web player supports free and paid Spotify accounts, so keep your login information handy.

    1. Open Spotify Web Player in your computer’s preferred web browser.
    2. Click login in the top-right corner of the Spotify website.

    Spotify web player

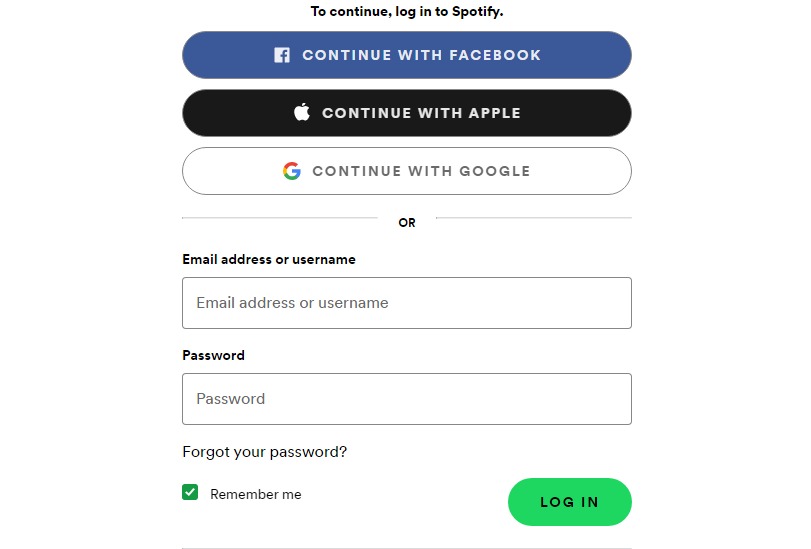
    1. 3. Enter your login information and click login on the following screen.

    spotify web player

    1. 4. Click on Sign Up for Spotify if you already have an account.
    2. 5. If you’ve signed into your Spotify account, you’ll see the primary screen for the Spotify Web Player.

    Now that Spotify Web Player is installed in your web browser, you can start listening to your favorite songs.

    READ ALSO: Here’s How to Fix Spotify Web Player Not Working

    Features of Spotify Web Player

    Spotify Web Player has many of the same capabilities as the desktop version. You can use it to play music, search for music, browse your libraries, view existing playlists and create new ones. Look at the features on the Spotify Web Player’s user interface.

    Home

    Home is the first item you’ll see on the left sidebar. You may find and play your music on the main screen of the Spotify Web Player by choosing this option. This screen displays playlists created just for you, recently played songs, and more.

    spotify web player home

    Search

    Select Search on the left sidebar to search for your favorite music. This launches the default search page on Spotify, where you can enter your search terms. Choose the box at the top of the screen and enter the name of a song.
    spotify web player search

    Your Library

    If you subscribe to these streaming services, you’ll be able to see the lists of artists, albums, and playlists you are currently subscribed to. You can find these items on the left sidebar of the ‘Your Library‘ section.
    spotify web player library

    If you haven’t followed anything yet, these tabs will be empty. Click the Find button to start following someone.

    Create Playlist

    Choose Create Playlist from the sidebar on the left if you want to make a new playlist for your tunes. After that, you can give your playlist a name and start adding music to it.

    spotify web player create playlist

    This playlist syncs with your Spotify account, so all your devices connected to the same account should display it.

    Liked Songs

    All of your tracks that you have “liked” are listed under Liked Songs. Spotify automatically includes a song in this list when you hit the heart icon for it.

    spotify web player liked songs

    Choose the Find Songs option to look for and add songs to this list if you’re new to Spotify and haven’t yet liked a song.

    Upgrade

    A button for upgrading is located at the top of the Spotify Web Player. If you want to upgrade your Spotify account, click this button.

    spotify 3 months premium

    You can choose a new plan for your account by clicking the button, which will open a new tab in your browser and direct you to the usual Spotify website.

    Account Details

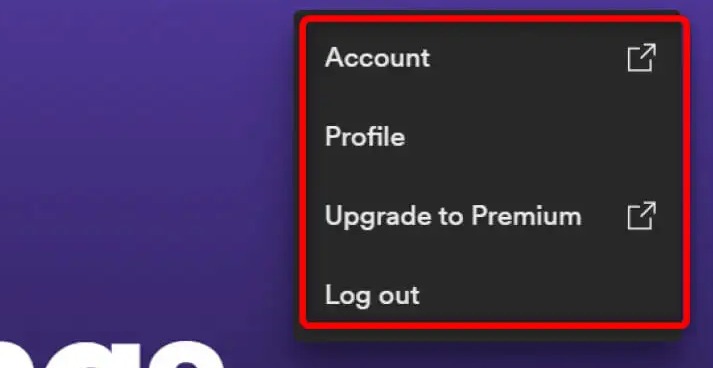
    You’ll notice your account name directly underneath the Upgrade button. To see other account settings, choose this option.

    spotify account name

    These choices are available on this menu:

    • To access and edit your Spotify account settings, choose this option.
    • To access and edit your Spotify profile, select this option.
    • Upgrade to Premium: You can upgrade your Spotify account with this option.
    • Sign off: By selecting this option, Spotify Web Player in your browser is closed.

    READ ALSO: These are the best games of 2021 according to Fbhtechinfo

    Music Player

    A mini-player will appear at the bottom of Spotify Web Player when a song is playing. You can use this player to manage how your Spotify music is played back.

    You can select the heart icon in this mini-player to add the song that is now playing to your list of Liked Songs. By selecting the shuffle icon, you can shuffle your music. The typical previous, play/pause, and following buttons are next. The current music track can also be played repeatedly by selecting the Enable repeat button.

    To view the lyrics of the currently playing song, choose the Lyrics option from the mini-right player’s side. To view your queued music, select the Queue icon. With the Connect to a device option in the mini-player, you can control playing for all of your devices if you use Spotify on another device.

    The volume can be changed using the controls at the far right of the mini-player. Drag the slider on this volume control to the left to lower the volume and to the right to raise it.

    How to use Spotify without the App

    Spotify Web Player is a terrific method to listen to your favorite songs if you’re using a shared computer or don’t want to install other software on your device. Nothing on your computer must be installed for this player to function in any mainstream web browser.

  • How To Activate Natgeotv On Apple TV, Roku, Xbox and Samsung TV

    How To Activate Natgeotv On Apple TV, Roku, Xbox and Samsung TV

    You must read this section if you want to activate Natgeotv on any media player, such as Smart TV, Xbox, Roku, or Apple TV. Those who are big fans of wildlife documentaries will always need to get the https://natgeotv.com to activate the link so they can watch Natgeotv on any available media player.

    As a result, there is no doubt that the activate natgeotv process will enable you to activate natgeotv com on Apple TV, Roku, and Xbox One. Furthermore, it occasionally requires the activate.natgeotv.com activation code, which you can obtain from roku.com/link.

    Even though Roku is a well-known streaming media platform, activating Natgeotv com is also relatively simple, as it has over 50 thousand channels, including National Geographic TV.

    READ ALSO: How to activate Windows 11 with a genuine license key

    As a result, if you have an Xbox 360 or Xbox One, as well as a Samsung Smart TV or Apple TV, you can easily activate National Geographic TV on Roku. As a result, some fundamental guidelines for national geographic media platforms must be followed.

    National Geographic Television actively contributes to providing access to National Geographic in whatever format you prefer. As a result, you can always watch your favorite episodes on the media player of your choice.

    Nat Geo TV, once again, provides free channels, including the Wild TV channel, to both US and international subscribers. So, let’s go over the steps for activating NATGEOTV COM on your devices.

    How to Activate Natgeotv Com on Apple TV, Roku, Samsung Smart TV, Xbox One

    Roku

    The National Geographic Channel can be activated on the Roku player using the website natgeotv.com/activate. Here are the most important steps you can follow to do so:

    1. Connect to Device

    To begin, connect your Roku media player to your TV and select activate on your device.

    2. Select Activate

    Following that, select NatgeoTV from the activate device section. All you need to do is write down the activation code that appears on your TV screen.

    natgeo activate

    3. Launch NatgeoTv in browser

    You must launch a new browser on your smartphone or computer and go to the specific NatgeoTv websites at www.nationalgeographic.com/activate.

    4. Sign in

    As the next step, you must sign into your National Geographic TV account, select your TV provider, and enter the Roku Activate code into the activation code field on your TV screen.

    natgeo activate

    5. Open a New Tab

    Open a brand-new browser tab and go to http://natgeotv.com/activate as an alternative.

    6. Open Activation Link

    To use the activation code to activate your Roku, navigate to https://ngc-auth.nationalgeographic.com/activate.

    7. Enter Activation Code

    The last step is to go to your TV screen and enter your Roku activation code, then wait a few minutes for your Natgeo TV and Roku player to link.

    READ ALSO: Product key to update Windows 10 Home to Pro

    Apple TV

    1. Natgeotv

    The Natgeotv app must be downloaded and installed on your Apple TV before using it.

    2. Select Activate

    You will need to click on the gear icon on your TV and select the option to activate your device. Make a note of the unique activation code displayed on your TV.

    Alternatively, you can open a brand-new tab on your computer or smartphone and then go to natgeotv.com/activate/ to view the Natgeotv website. You will be directed to https://ngc-auth.nationalgeographic.com/activate, where you will see a brand-new page.

    3. Enter code

    Once the code is obtained, it needs to be entered on the TV screen, and the submit button needs to be clicked.

    4. Connect to Natgeo website

    Finally, you will have to wait a few minutes for your NatgeoTV, and Apple TV accounts to connect to the National Geographic website.

    READ ALSO: How to download and install Disney+ on Phillips Smart TV

    Xbox

    If you use an Xbox 360 or Xbox One to watch National Geographic videos, it’s easy to sign up.

    To sign up for a NatGeo account, you must visit this page and fill out the code shown.

    Samsung Smart TV

    1. In this case, you must launch the appropriate web browser on your TV.

    2. Following that, you must go directly to www.natgeo.com/activate.

    3. The precise activation code must be entered as the last step to begin watching National Geographic TV.

    READ ALSO: Windows 11: How to disable automatic brightness

    How to Easily Watch The National Geographic Channel Online

    If you don’t have any of the gadgets above, you might also think about watching National Geographic HD live on your computer. You only need to go to https://www.nationalgeographic.com/tv/shows/ to do this. However, this Natgeo live TV is once more restricted to a few areas.

    Conclusion

    As a result of the aforementioned section, it is now very clear that these are the key actions that must be carried out in order to activate Natgeotv.com on all media players, such as Roku, Apple TV, etc.

  • 3rder App: How To Delete Your Account

    3rder App: How To Delete Your Account

    There are various reasons people might want to close their account, and we will guide you on how to do so. But first, we want to walk you through how to delete, close, or otherwise manage your account.

    On the other hand, 3rder provides a professional and anonymous platform for all users to enjoy their time on the app. 3rder is a professional dating app that matches up single people with their perfect partner. As a result, they closely inspect each user’s profile and remove fake accounts from their system.

    Why is 3rder Not Working

    If you’re having trouble with 3rder, it’s likely due to one of the following reasons:

    1. You don’t have a 3rder account
    2. You haven’t authorized 3rder to access your account
    3. There’s an issue with the 3rder service
    4. You’re using an outdated version of the app
    5. You’ve accidentally logged out of your account

    READ ALSO: How to Permanently Delete your Facebook Account Easily

    How To Delete 3rder Account

    If you are concerned that your personal information has been collected about you, you may request that they delete it. Please note that certain exceptions apply.

    Once they receive and confirm your verifiable request, your personal information will be deleted from their records unless an exception applies. In other words, if they cannot verify your identity, they will deny your request to delete the information. They may also deny your request if keeping the information is in their best interests or the interest of their service provider(s).

    The following steps must be followed:

    1. Sign into the email account associated with the account to be deleted.
    2. Send an email requesting the account be deleted, along with a good explanation. The body of your message must include your account information.
    3. Next, type “REQUEST TO DELETE MY ACCOUNT” in the Subject section.
    4. In the last step, email [email protected]

    How to Close your 3rder Account

    There is no information on the deletion of an account on the website. However, when those details become available, this page will be updated. Additionally, I am sure that this article met your current need. I am also sure that you would like to read more articles like this/related to this. Get the latest information on this topic and similar articles by visiting this website constantly.

  • Dayforce Trader Joe’s Login Guide: How to Log in as an Employee or Administrator

    Dayforce Trader Joe’s Login Guide: How to Log in as an Employee or Administrator

    For those looking to login to Dayforce Trader Joe’s, there are several options depending on your business needs. For example, you can use Dayforce Trader Joe’s as an employee if you simply need to access your timecard information; or you can use it as an administrator in order to manage employee data and permissions.

    In this guide, we’ll walk you through all the steps necessary to log in using both roles and give you helpful tips along the way. Let’s get started!

    Employee Login Instructions for Dayforce Trader Joe’s

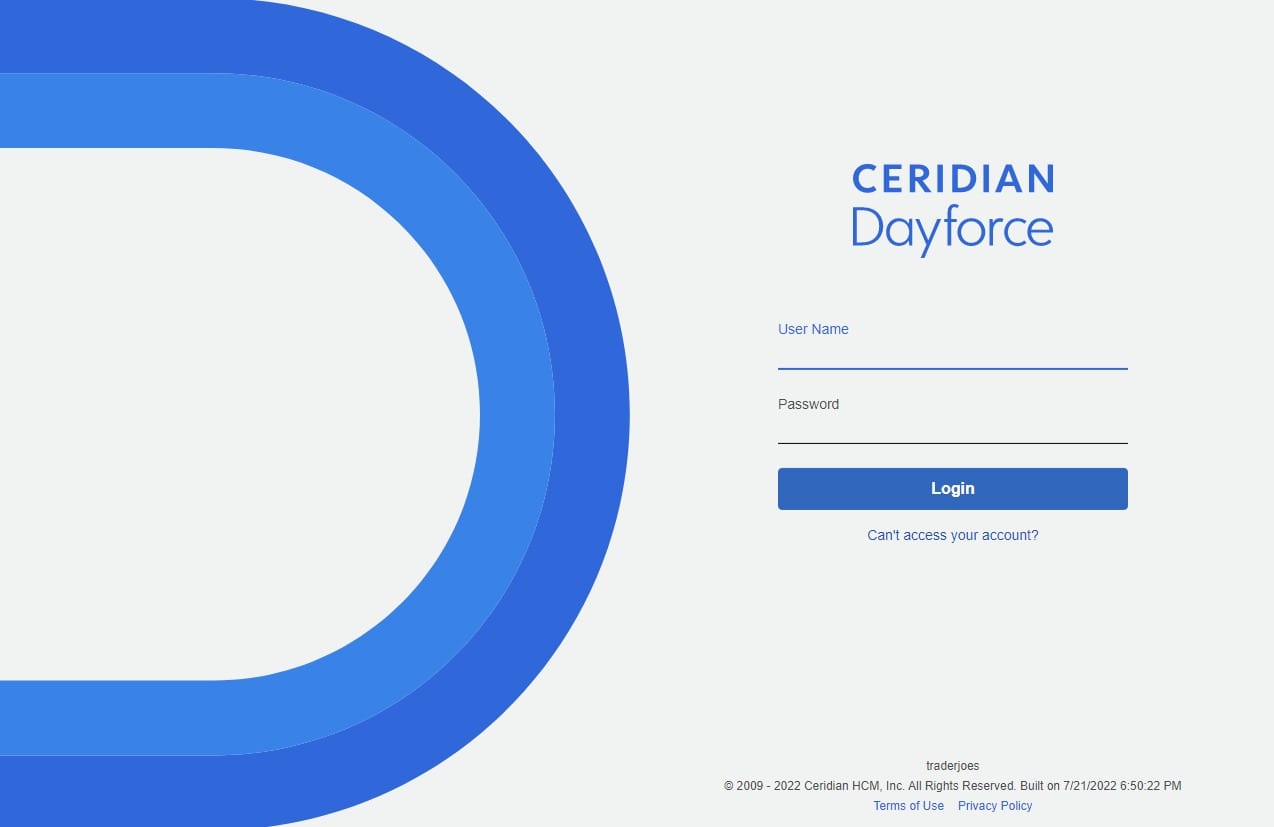
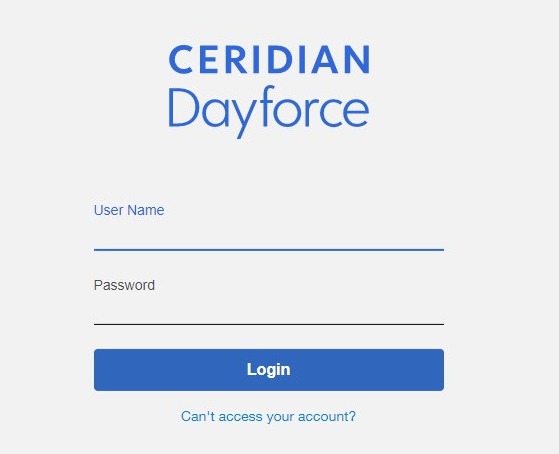
    ceridian dayforce

    If you’re an employee of Trader Joe’s, you may wonder how to log in to Dayforce. Dayforce is a popular software for many businesses in America, and Trader Joe’s is no exception. Here are the steps you need to follow to log in as an employee or administrator

    Step 1

    You must first get in touch with your company’s Dayforce Administrator to obtain your Dayforce Trader Joe’s login information.

    Step 2

    If you’re an employee of Trader Joe’s, you can log into Dayforce using your existing Trader Joe’s user ID and password. Once you’re logged in, you’ll be able to view your shifts, timesheets, and other information. You can also clock in and out of your shifts using Dayforce.

    Step 3

    Once you have your Dayforce Trader Joe’s sign-in information, go to this Dayforce Trader Joe’s login webpage (page) on your computer or mobile device.

    Step 4

    Enter your login information (username and password) to access day force TJ’s account. That’s all there is to it; now, you can access Trader Joe’s website at work using Dayforce.

    Administrator Login Instructions for Dayforce Trader Joe’s

    If you are the Dayforce Administrator at Trader Joe’s and trying to access the login page, you can get assistance by the following two things:

    1. If you need assistance, call 1-855-432-9367
    2. To get expert support, visit https://www.ceridian.com/support/login

    READ ALSO 2 Ways to login to your Netflix Account

    Having trouble logging on to Dayforce at home?

    Some of our employees need to log into Dayforce while at home, and many have trouble accessing their Dayforce Trader Joe’s account. Here is a thing you could try:

    • You may have to log in multiple times to get Dayforce to accept your details because sometimes it shows a login error before it accepts your details.
    • Clear your browser cache and cookies, then copy and paste the webpage into your browser search bar and hit enter
    • For additional assistance, don’t hesitate to get in touch with your Dayforce administrator.

    These instructions apply to employees trying to connect to their Dayforce accounts from a PC and a mobile device.

    Mobile App (Dayforce)

    Dayforce has developed a mobile app for anyone who used to log in through their Android or iOS devices. You can download the Dayforce mobile app here (Android and iOS) to use some features not available in the desktop version.

  • How to Locate Downloaded Files on Any Android Device

    How to Locate Downloaded Files on Any Android Device

    It is usually simple to locate downloaded files on your Android device. The steps to find them vary slightly depending on your device type, but the downloaded files occasionally “disappear.” What happens if you want to view or remove them? Perhaps you are unaware of where to search or don’t check frequently. In any event, managing your downloads will help you organize your files and conserve some more storage space.

    However, the files are still present. Look through the settings on your Android device to find them. To keep those downloaded files under control, you might occasionally need to use a file manager. Let’s examine some potential choices.

    How to locate your downloads using the file manager

    Integrated file manager

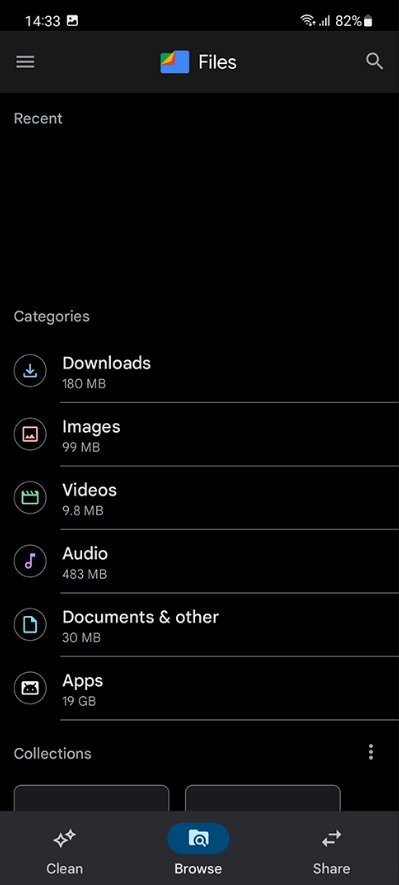
    Android includes a “Downloads” folder to house all your downloaded files, just like most operating systems. Unfortunately, this won’t often be downloadable as an app but as a folder inside a file manager.

    However, the Files by Google app is now pre-installed by default from more Android device manufacturers. However, Samsung still provides its own proprietary file manager on its Galaxy smartphones. However, the Files by Google app is simple to use on most Android devices, making it a fantastic all-around option. This benefits the customer by maintaining a consistent experience and a familiar interface.

    1. Open the Files application, then select the Downloads tab.
    2. The All tab, by default, displays each file you’ve downloaded.
    3. Select the Download tab to see only the files in that exact folder.

    The list of your downloaded files should have the most current item at the top. You may modify, distribute, and sort files by tapping the three-dot menu option in the top right corner of the screen. You can also clear your download history.

    You can use the “Sort by” option to arrange your downloads in whatever way that works best for you, whether by time, kind, name, size, ascending or descending.

    Alternatively, you can hit the three-dot menu icons next to specific files in your downloads list to access options like Delete, Share, Rename, and more.

    Third-Party File Explorer

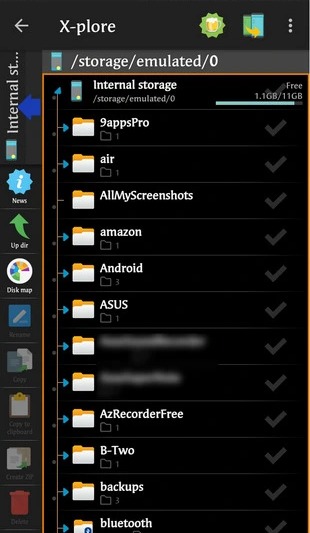
    Although Android’s built-in file manager functions adequately, it is not flawless. Try using a third-party file explorer tool if you still can’t find what you’re looking for. There are numerous Android file managers available. However, X-plore File Manager is a very well-liked and practical alternative. It is a personal favourite because of the dual-pane feature.

    It is simple to use. There is a Find option on the right menu. The complete file name is not required to be known. I also appreciate the search box’s inclusion of search tips. You can quickly find your file by entering a portion of the name.

    How to locate your downloads using the Mobile Browser

    Download an Additional File

    Why would you download anything else if you can’t find your Android downloads right now? You receive a notification in your device’s notification tray when a file is downloaded. The alert has the appearance of a checkmark. When you tap it, you are sent to the downloaded file, where you can also see where the download originated. Finding out where your downloads are automatically stored is simple with this method.

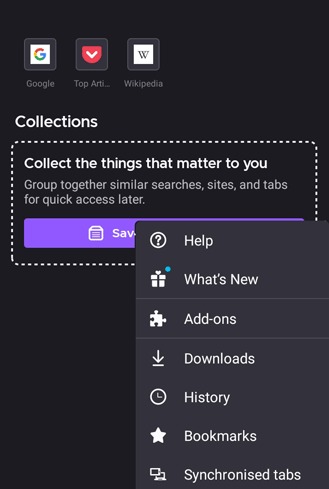
    Firefox Browser

    1. Finding your downloads is just as simple with Firefox.
    2. Once the browser is open, click on the three vertical dots in the top-right (or bottom-right, depending on how your device is configured) corner of the screen.
    3. After that, tap “Downloads” to continue.

    firefox downloads

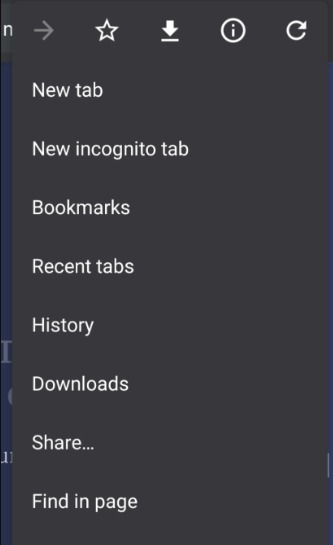
    Chrome Browser

    1. Open Chrome, select the three-dotted menu symbol in the top right corner
    2. Select Downloads to view your list of browser-related downloads to recover that image.

    Tap on the drop-down box next to Downloads and select videos (or whatever file type you’re looking for) to find a specific file, like a video.

    How to Locate the Downloads Folder on a Windows Computer

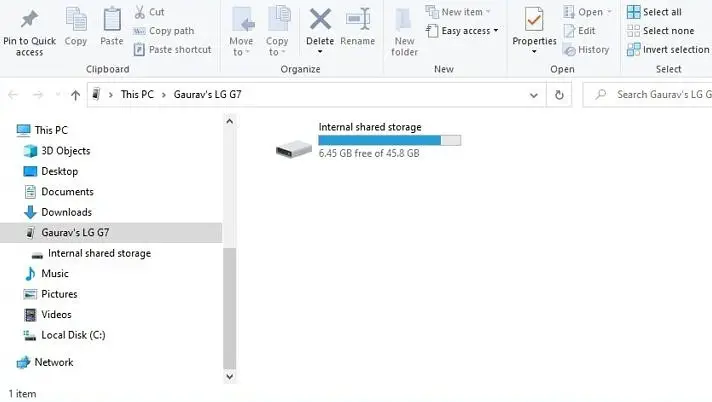
    You can always look at your downloads on your computer if you can’t tolerate how little things look on your Android handset. Connect your Android device to your computer using a USB cord, and you should see a prompt appear within a few seconds, offering to display the contents of the device you linked. The following window will provide numerous options such as import/export (among others).

    1. Select the one that lets you view the contents of your Android smartphone.
    2. Scroll down until you reach the Downloads folder by selecting the Phone option.
    3. Simply open it and do whatever you want with it.


  • How to Find My Phone and Track Its Location

    How to Find My Phone and Track Its Location

    You may find out a smartphone’s position in a variety of methods. Both Android and iPhone handsets include utilities for tracking your whereabouts built in. These services are available as long as the GPS location services on the phone are activated and the owner has given an app permission to access this data.

    These location-tracking services can locate your phone in the following way:

    How to Find the Location of Your Phone by Number

    Finding your phone number is something that many people fantasize about. Unfortunately, there isn’t an app that can tell you where a phone is just by its phone number. Any software that makes such a claim on the Google Play Store is fake. The only way to track a mobile phone’s position is by using software installed on the device. The software needs the owner’s permission to use the phone’s location services.

    Share Device Location on Google Maps

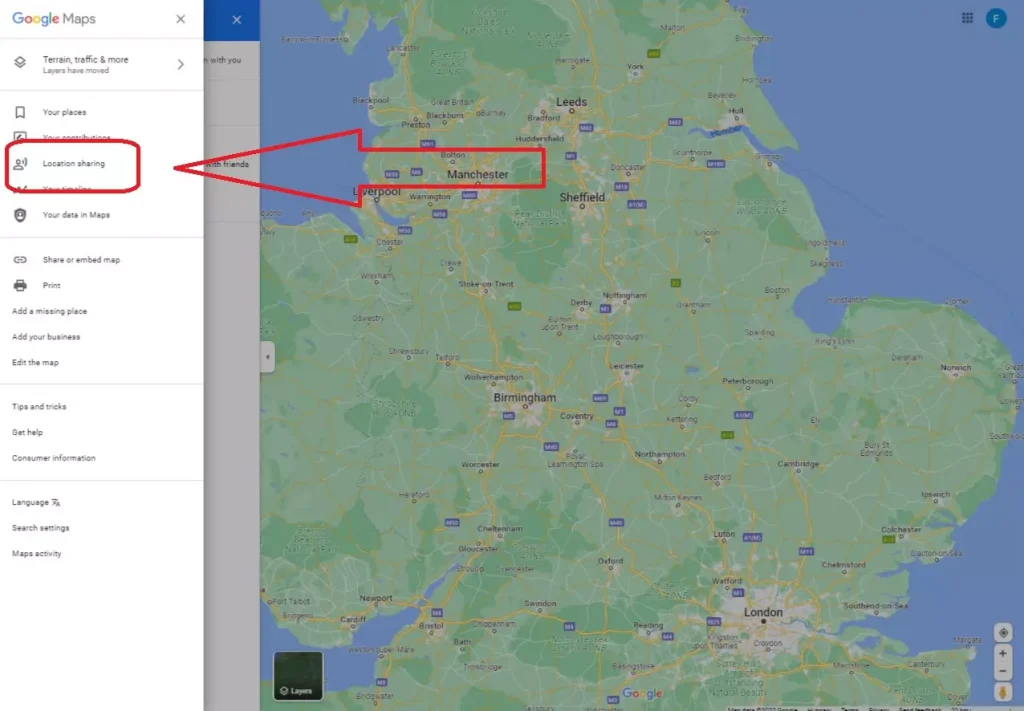
    Sharing your position via Google Maps, one of Maps’ most extensive features, is another excellent method to help your loved ones find where your phone is.

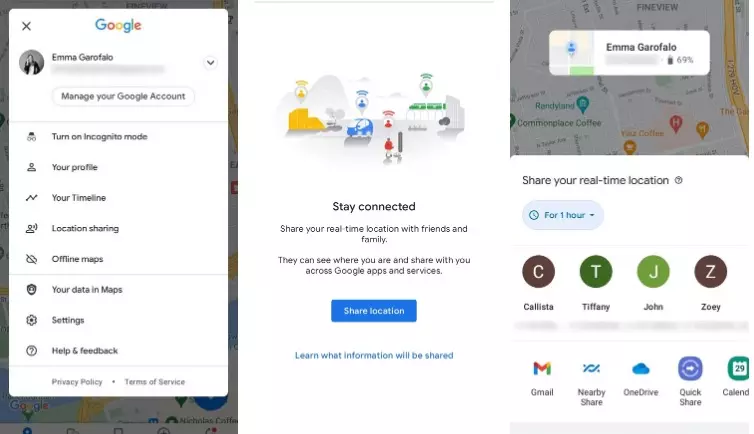
    You must first enable the feature in the Google Maps app before you can start sharing location data. Location Sharing can be accessed by tapping the profile symbol in the top right corner. When you tap Share location, a panel with options for sharing your real-time location with others will open. A screen will explain how the feature works.

    You have the option to do this for an extended period, such as one hour or indefinitely, until you manually turn the feature off. It’s an excellent approach for parents to give their children peace of mind while they’re away for whatever reason. It’s also a terrific tool for parents to find out where their children are. With the location-sharing function of Google Maps, you can use the GPS tracking capabilities of your Android phone.

    Find an iPhone using Apple’s Find My iPhone service

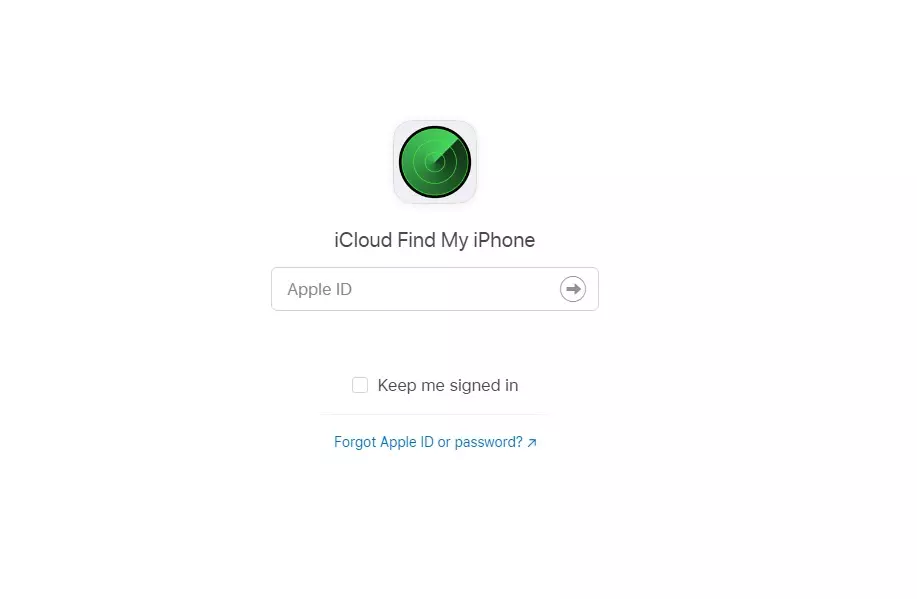
    Apple’s Find My iPhone service allows you to find an iPhone’s location. You must activate location services on your iPhone for this to function, much like when tracking an Android device. If you do, you may use a computer or other device to log into iCloud and track your iPhone similarly. From an Android device, it makes it simple to locate your iPhone.

    This fantastic service greatly enhances the possibility that a user will discover their lost iPhone. If you find a lost iPhone, you may join success stories like this.

    Offline will appear right away beneath the device name if Find My iPhone cannot locate your iPhone. Find My iPhone will show the most recent location for up to 24 hours. If you check the box next to Notify me when discovered, Apple will send you an email when your iPhone is located.

    Find an Android phone using Google’s Find My Device service.

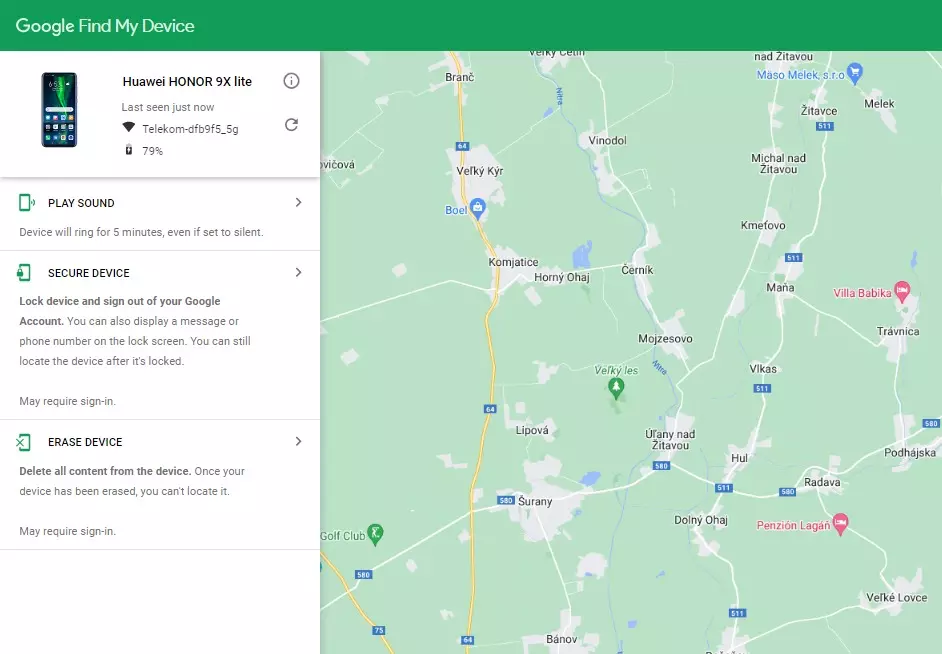
    It’s pretty simple to find where your Android phone is. You can use Google’s Find My Device page as a Google phone tracker to find your phone’s location as long as location services are enabled on your Android device.

    When you do, Google Maps will display a pinpoint of your phone’s exact GPS location, indicated by a small green icon. If your phone is not in your possession right now, you can use the three services listed to the left of the map:

    • Play Sound: Even if the volume is silent, your phone will sound the alarm for five minutes. You should be able to hear the phone if it is anywhere near you.
    • Secure Device: If you know your phone has been lost, you can lock it to prevent unauthorized access. With this option, you can still find your device; even better, you can show a phone number that someone may call if they find your device.
    • Erase Device: If everything else fails, you can remotely delete the entire contents of your device.

    Make that location services are turned on and that Google has been given permission to track your phone’s location. Go to Settings > Google to do this. To turn to track on, select Find My Device and toggle it on. However, Find My Device is usually on as long as you link a Google account to your phone.

    Your phone must also be turned on, online, have to Find My Device activated, and be accessible through Google Play for it to function.

  • Here’s How to Fix Spotify Web Player Not Working

    Here’s How to Fix Spotify Web Player Not Working

    You can listen to your favourite music on Spotify’s web player without downloading an application. Spotify’s web player may not function for several reasons, the most common of which is a problem with your web browser.

    Given that it allows you to access the Spotify musical universe through your web browser directly, the Spotify web player ought to be among the most adored websites on the planet. It’s somewhat brilliant but also incredibly flawed; many users have reported that it doesn’t function correctly or at all on different browsers. The solutions to the problems with the Spotify web player are listed below.

    Incognito Mode

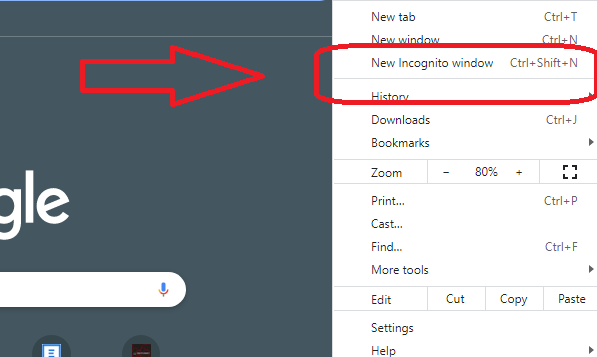
    You can quickly check to see if an extension or feature in your browser is interfering with the web player before moving on to most of the advice in this list. Try opening a private window for the web player. This default opens a browser window devoid of extensions, cached information, and other features that occasionally obstruct Spotify’s functionality.

    1. Click the three dots in the top right corner of Chrome and choose “New incognito window” to open a private window.
    2. In Microsoft Edge, select “New InPrivate window” from the three-dot menu at the top right to open a private window.
    3. If the web player functions properly in a private window, you should try clearing your browser’s cache and disabling each extension at a time to determine which one was the issue.

    Flush DNS and clear the cache

    Your DNS settings are used by Spotify and other websites you visit to resolve domain names. You’ll need to remove this troublesome cache if your DNS cache has problems or has become corrupt to resolve site-related issues.

    If your web player launches and appears to function well, except that no music is being played, you should try clearing your system’s DNS cache. When you do this, your computer’s DNS cache will be updated, ensuring its domain name is registered correctly the next time you log in.

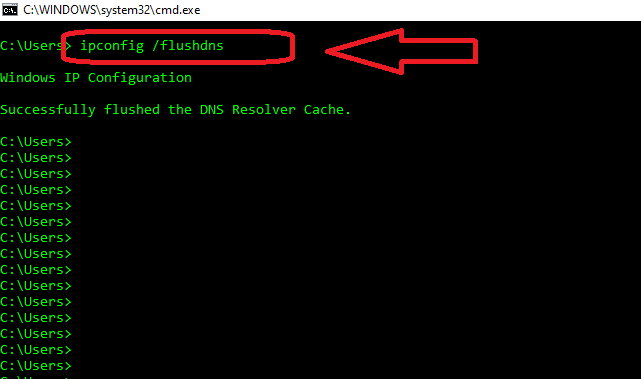
    1. Command Prompt (Admin) or Windows PowerShell (Admin) can be accessed by right-clicking on the start menu.
    2. Enter the ipconfig /flushdns command.

    Clear Browser Cache

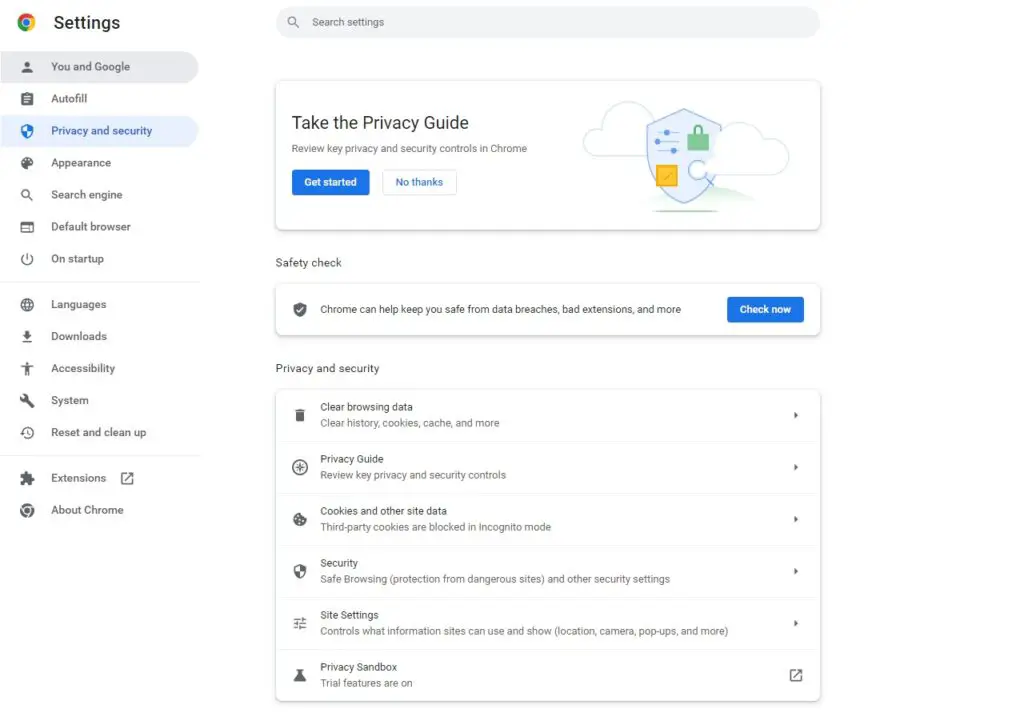
    To make browsing faster, your browser stores images and web pages in a cache. Sometimes, this cached data causes problems and prevents your internet music players from functioning. Clearing the cache in your browser could fix the Spotify problem. The majority of browsers make clearing your cache files simple.

    1. Open Chrome and enter the following into the address bar: chrome:/settings/clearBrowserData
    2. Select Clear data at the bottom, enable Cached pictures and files, deselect all other choices, and pick All time from the Time range drop-down menu.

    Enable Playback of Protected Content

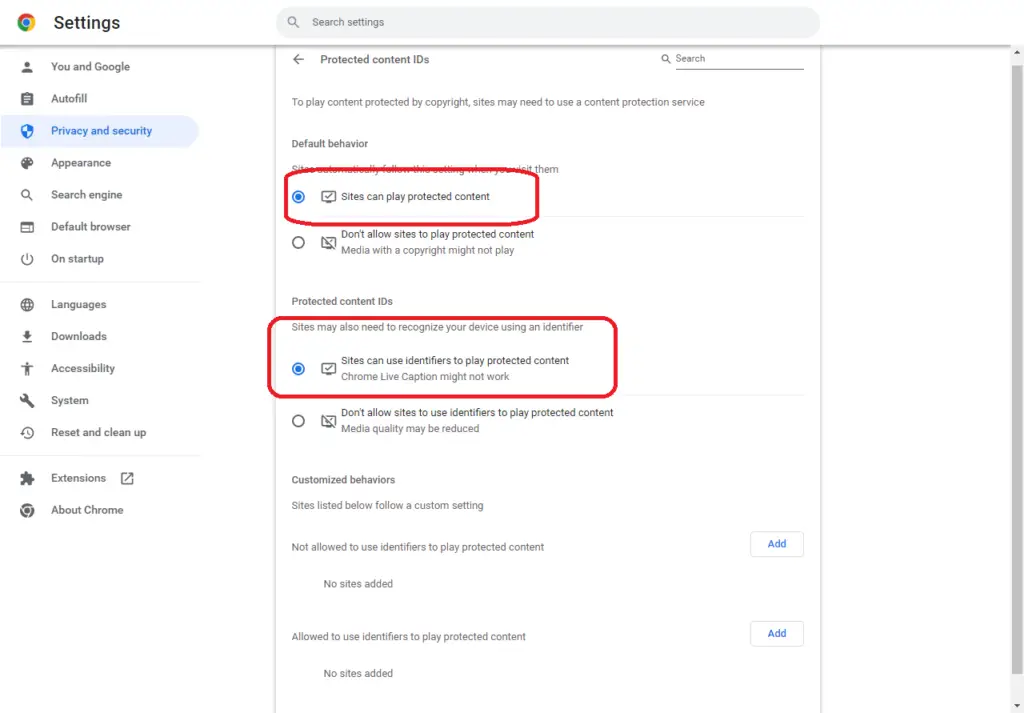
    Make sure protected content is enabled in your browser if you try to launch the Spotify online player and see the message “Playback of protected content is not enabled.” Here’s how to enable the playback of protected content in Google Chrome since you probably only encounter this problem with this browser:

    1. Enter the following text after you type it in Chrome’s address bar: chrome:/settings/content
    2. Select Protected content IDs under Additional content options.
    3. Activate the settings for both sites’ ability to play protected content and sites‘ and ‘ability to utilize identifiers to play protected content.’

    Turn off any Adblocker

    Your web browser’s ad-blocker extension might prevent Spotify’s online player from loading music. Ad-blockers frequently cause various problems with the playback of online media.

    1. In Chrome’s top-right corner, select Manage extension by right-clicking your ad-blocker extension.
    2. To disable your ad-blocking extension, turn off the toggle.
    3. You’ll discover that the Spotify web player is now functional after closing and restarting Chrome.

    Frequently Asked Questions

    1. What is the difference between Spotify Web and Spotify Desktop?

    The main difference is that if you download the desktop player, Spotify may be used as a standalone application. The web player can load more slowly than the desktop application. When using the desktop software, you can increase the audio quality to 160 kbps and 320 kbps, respectively. However, the Spotify Web Player only allows 128 kbps for free users and 256 kbps for Premium subscribers. The Spotify

    2. Can you use Spotify on Mobile?

    Yes, even though the website will encourage you to download the Spotify app in its place, you can still get around this and log in using your favourite mobile browser.

  • Full guide: How to login to your Hulu Account

    Full guide: How to login to your Hulu Account

    Hulu is a streaming service just like Netflix, that has been around for more than a decade. Hulu has been bought by Walt Disney and consists of some of your favourite TV shows, news and sports. If you’re finding it difficult or are confused on how to sign in to your Hulu account, this guide will help you easily get by this problem.

    How to sign up for a Hulu Account

    Before creating a Hulu account, find out which of the streaming plans is best for you. Hulu offers similar streaming plans next to Netflix. To learn more about Hulu’s subscription plans, see its official help website at https://help.hulu.com/s/article/how-much-does-hulu-cost. Kindly follow the steps below to know how to sign up for a Hulu account.

    1. Navigate to www.hulu.com website

    2. Click on the “Sign up for Hulu only”

    3. Choose a plan from Hulu (ad-supported), Hulu (No Ads), Hulu + Live TV, or the Disney Bundle, then click on next.

    4. Enter your “Email“, “Password” and any other personal information.

    5. Select a payment method that you will use, either with a Credit card, Paypal or a Gift card

    6. To finish the login step and activate your Hulu account, click “Submit.”

    When you sign up for Hulu, you receive a 30-day free trial beginning when you bought the subscription. You’ll be charged the monthly amount once the trial has been completed. You will be automatically charged if you alter your subscription plan while the trial period is still in effect. Also you will lose your free trial if you decide to cancel your membership.

    How to login to a Hulu Account on Computer, TV and Mobile Devices

    You can enjoy various entertainment with the technological devices readily available at home. Thanks to your devices, it is entirely feasible to play video games, read the book series you have been eager to read, watch a movie, or watch the television shows.

    In terms of movies and television shows, the internet has enabled you to get much of the same stuff you desire. You can watch various videos on your computer or mobile device, free on services like YouTube or with a paid subscription to services like Netflix.

    Hulu login on Computer/Laptop

    If you wish to stream Hulu from a computer or laptop, you will need your email address and password to sign in to your Hulu account.

    1. Go to www.hulu.com to access the Hulu Login page on a compatible web browser.

    2. In the top-right corner of the screen, click the “Login” button.

    3. Once the login form loads, you must enter your email address and password

    4. Choose “I’m not a robot.”

    5. Finally, select “Sign in.

    How to login to a Hulu Account on Smart TV Devices

    Due to its functionality and Disney ownership, Hulu is a fantastic platform for watching anything you want. You can watch material from other platforms on it. Because of all the quality advantages that come with its many service packages, watching it on your Smart TV may be a fantastic option. Here are the steps you need to take in order to log into a device that is linked to a TV:

    1. On your device, launch the Hulu app.

    2. Press the ‘Login‘ button on the Welcome screen, followed by ‘Login on this device.

    3. Using the on-screen keyboard, enter your email address and password before clicking ‘Login.’

    4. To begin streaming, select your profile from the list.

    How to login to a Hulu Account on Mobile Devices

    To access your Hulu account on your mobile device or tablet, first, install the Hulu app and then follow the steps outlined below:

    1. Open the Hulu app on your smartphone or tablet.

    2. On the Welcome Screen, tap ‘Log In,’ then ‘Login with Hulu.

    3. After selecting your profile, you can now begin streaming.

    How to fix Hulu login issues

    Most Hulu users have expressed frustration at their inability to log in for a variety of causes. If you belong to this group, the list of Hulu login problems and their solutions below will undoubtedly be of assistance to you:

    • Forgotten Email

    You can utilize Hulu’s official account recovery tool at https://auth.hulu.com/account recovery if you’ve forgotten the email address you’ve used to sign in to your account. You will have three chances to enter the necessary data accurately; if you are successful, your login email address will be available.

    • Reset Hulu Password

    If you remember the email address you used to sign up with Hulu but not the password, you can reset it by following the steps below:

    1. To get started, use the “Forgot Password” option.
    2. Click “Send me a Reset Link” and enter the email address associated with Hulu.

    You can ask Hulu for assistance if you can no longer access the email address connected to your Hulu account.

  • 2 Ways to login to your Netflix Account

    2 Ways to login to your Netflix Account

    Netflix has dominated many streaming platforms and has become famous for its access to popular movies such as Squid Games, Money heist etc. Therefore Netflix needs no introduction as you probably already familiar with it. Netflix unlike youtube, doesn’t show you ads when you start to watch content. This comes with a catch of a monthly subscription.

    Netflix also offers an option to download movies and TV shows when you’re not connected to the internet. This is a great tool if you’re traveling, you can take the time to download your favourite contents and watch.

    How to login into your Netflix Account

    If you have purchased a Netflix account, you should familiarize yourself on how to sign in to your account. Kindly follow these steps carefully:

    1. Website Netflix.com

    • Open a web browser and navigate to netflix.com, the Netflix homepage.
    • The “Sign in” button is located in the top-right corner.

    • Type in your “Password” after entering the email address or phone number associated with your Netflix account, and then click “Sign in.

    • Alternately, you could click the “Login with Facebook” option to sign in to your Netflix account using your Facebook account, but on the 2 May 2022, Netflix stopped supporting this option.

    2. Netflix App

    The Netflix app has dominated the streaming sector on Google Play Store and the Appstore. You can find the links to the Netflix app below.

    The Netflix App also comes with a Sign in page. After installing the App, type in your “Email” and “Password” you used to register, and tap on “Sign in”. There are not always times when you would successfully login to your Netflix account. This can be a challenge when you want to stream a movie or Tv show and you don’t have access even though you’ve paid for your subscription.

  • How to download and install Disney+ on Phillips Smart TV

    How to download and install Disney+ on Phillips Smart TV

    Disney + is now just one of many streaming services for watching movies and television shows. Many users desire to utilize it because it is one of the most well-known today.

    Using a large screen, such as a Smart TV, to view movies and television shows is one approach to get the most out of this platform. This post will describe how to quickly and easily download and set up Disney+ on a Phillips Smart TV. The audience will find it simpler to appreciate the content on the streaming platform as a result.

    What you need to know

    One of the best features of these smart TVs is that you can install programs from them and use them in addition to the standard content, such as Netflix, Disney Plus, HBO, and others. Because of this, it’s crucial to consider a few aspects of the Phillips Smart TV before installing Disney Plus.

    To begin with, you must understand how to use the Smart TV. It is crucial to read the handbook that comes with it before using the device. It will be pretty simple to manage the Smart TV and install the applications you wish to use once you have read the manual and understand how to use it.

    The Smart TV must also be connected to the internet to function; otherwise, it cannot be used because Smart TVs require a connection. It’s critical to know such little particulars so that the Disney + installation runs well.

    READ ALSO: How to change the profile picture of your Netflix account

    Supported SmartTVs

    The problem with installing Disney+ on Smart TVs is that if the TVs are ancient, they cannot download and install Disney Plus. Because of this, it is stated that Android, Samsung, and LG TVs are superior to Phillips in this area. However, to ensure it can work with the Disney + installation, the year it was released must be considered.

    • Android TV
    • Samsung TV
    • LG TV

    Since installing video games and other components on Samsung and Android TVs is more spartan, many customers think they are far superior to other models. Even in this case, the choice of which brand to purchase is left up to the individual user.

    How to check if it is possible to install Disney Plus on your Philips Smart TV

    Recently, these smart TVs began offering the option to download and install Disney Plus. That is why many people still believe it is impossible to see it from here and that other platforms will be used because they are unaware of the current novelty that it can be seen.

    The factory year of the TV must be considered when determining whether it is possible to install Disney Plus on the Phillips Smart TV. If the Smart TV was manufactured between 2017 and 2018, Disney+ could be installed without issue. Users can be confident that they can view their programming in Streaming with it.

    But what if the Smart TV was created before 2017? Before 2017, Smart TVs were also available. However, fewer people—or at least fewer—had one overall. But back then, other options were available for people who wanted to use the Disney + platform.

    READ ALSO: Philips OLED TV with its powerful sound bar arrives

    Alternative Smart Devices to watch Disney+

    Many people adore Disney films and others like Marvel, which are available on Disney +. Other solutions are available if the customer wants to watch the Disney Plus movie and television schedule on his Phillips TV. Still, it cannot download and install the application.

    The platforms are compatible:

    • Chromecast, Apple TV, Roku, Amazon Fire TV, Xbox One, and Apple TV.

    For the latter, Disney Plus streaming will be made simpler by the several Phillips TVs that come with an integrated Chromecast.